The Web Scheduler provides managers with an easy-to-use scheduling process. This guide reviews the layout of the Web Scheduler for easy access to its many features.
Accessing Web Scheduler
To access your QSROnline account, go to my.qsronline.com. Sign in with your QSROnline username and password.
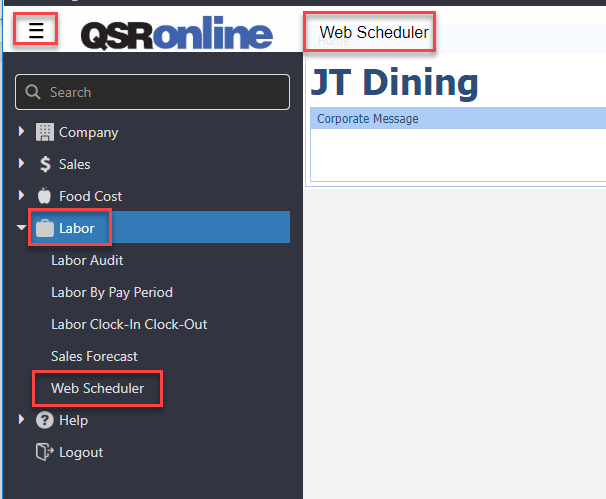
Click Web Scheduler in the quick links at the top of the screen or go to Menu, scroll down to Labor and click Web Scheduler. You may also use the search bar in the Menu to quickly find and click the Web Scheduler link.
Unit/Week Selector
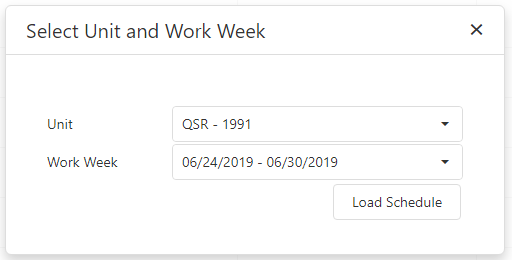
After opening Web Scheduler, the Unit/Week Selector popup will appear. This will allow you to choose the Unit and Week you would like to view prior to loading the Web Scheduler.
Tutorial
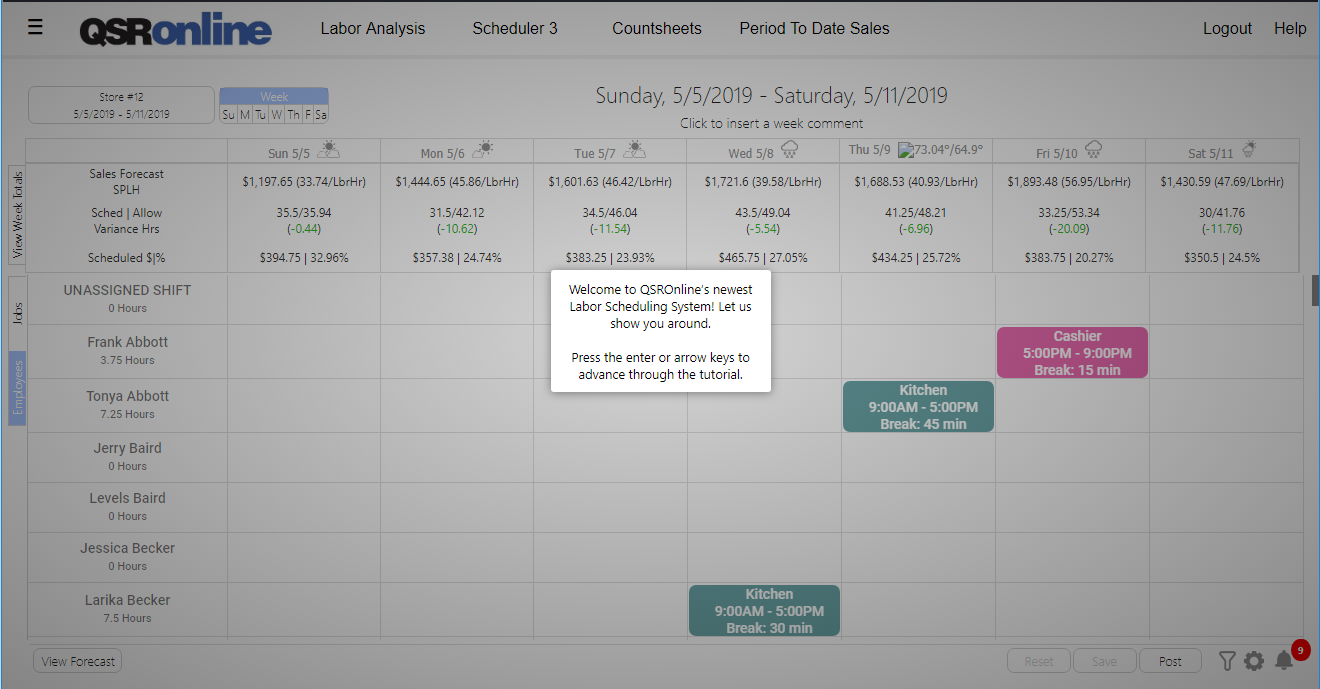
The first time you access the Web Scheduler, a new user tutorial will begin. Hit the Enter key or right arrow on your keyboard to navigate through the different sections.
Help
The Help button on the upper right-hand corner will allow you to see the following options. 
- Visit QSROnline Guides – This is a quick link to access this website from within my.qsronline.com (support.qsronline.com).
- Submit a Ticket – This button takes you to a form to quickly submit a ticket directly to QSROnline Support.
- View Tutorial – View the Tutorial again if needed. Remember to click Enter or the right arrow on your keyboard to advance the Tutorial.
Web Scheduler Layout
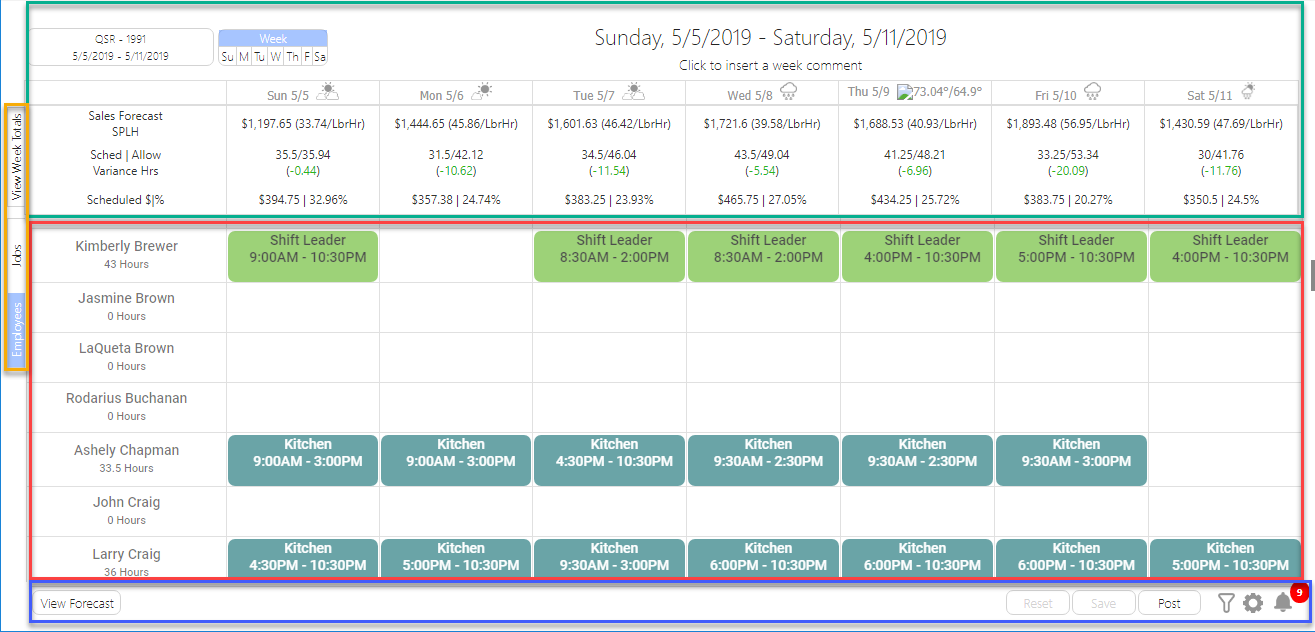
Web Scheduler has four zones: the header and metrics grid (highlighted in green), side tabs (highlighted in orange), scheduler editor (highlighted in red), and footer (highlighted in blue).
Header Options
The Web Scheduler has a header that contains the following options. For details on the Header Toolbar Options, refer to the Header Options.
- Unit/Week Selector – Administrators can use the unit selector to switch between each location’s schedule. This functionality allows you to choose the store and week you would like to view or build a schedule for.
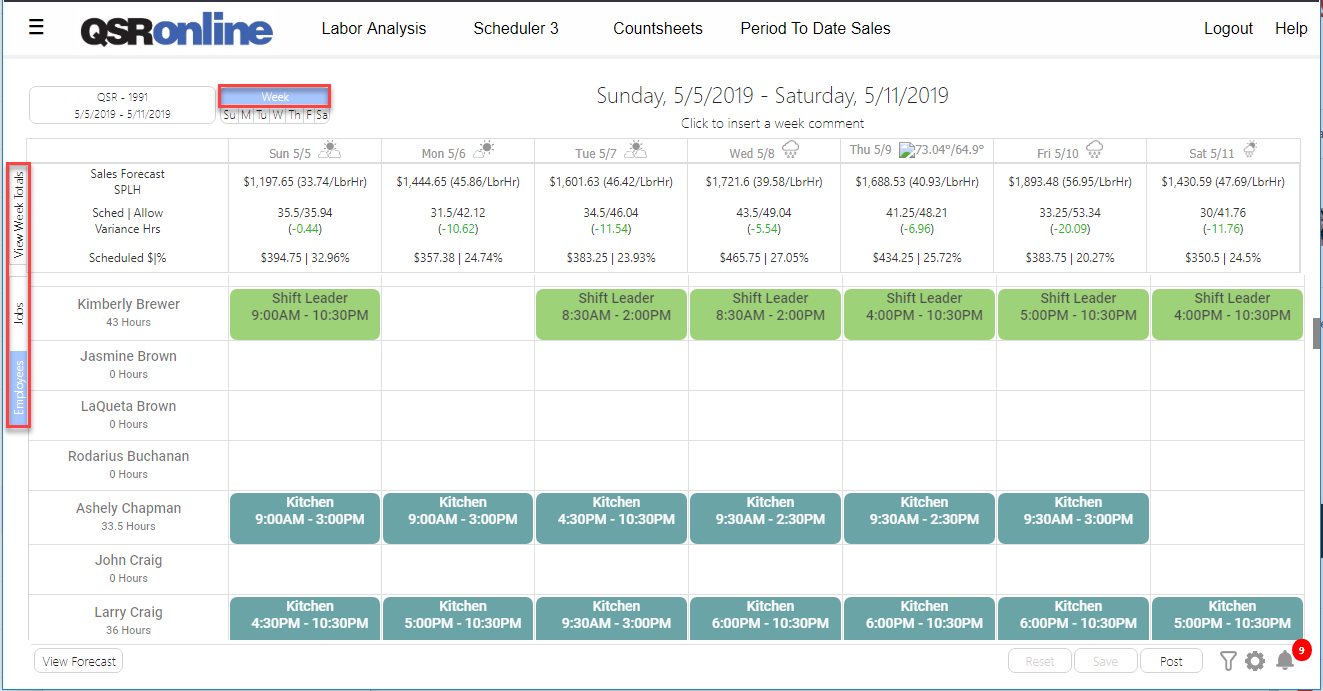
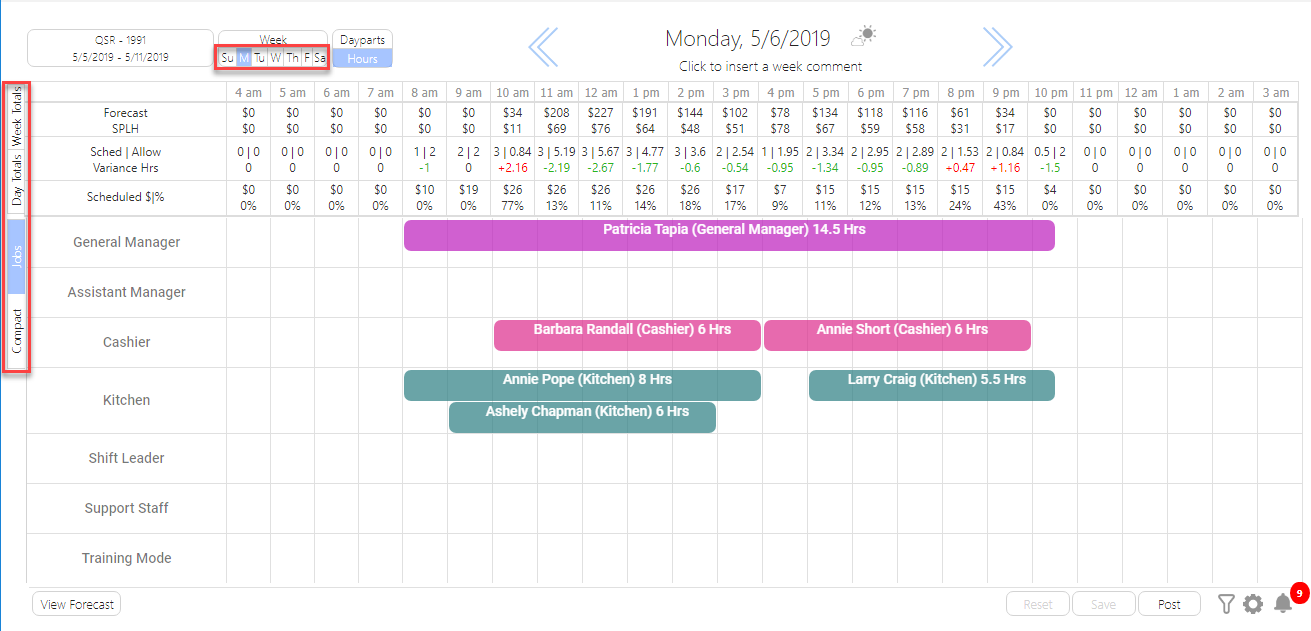
- Schedule Views – Web Schedule allows you to view the schedule in the schedule editor by Week or Day. Most scheduling managers will build their schedule initially in the week view, then refine their schedule with the daypart and hourly metrics available in the day view.
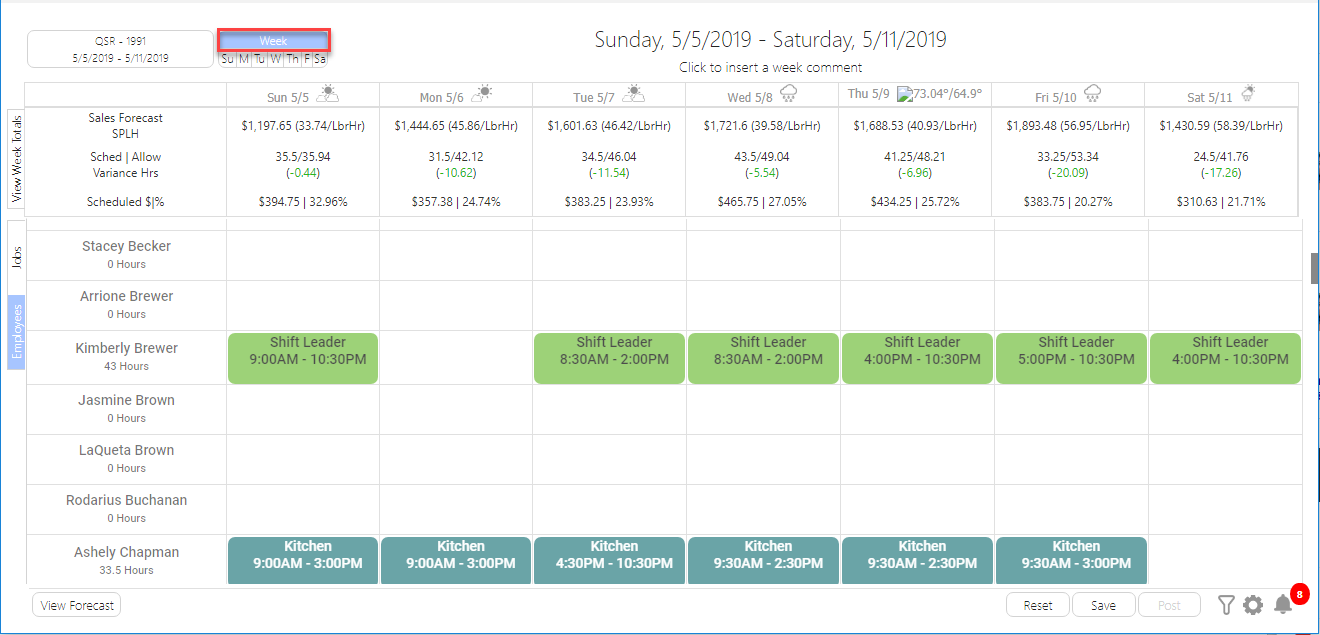
- Week View – This allows you to view the schedule for the selected Week using the following groupings.
- Group by Employee
- Group by Job
- Week View – This allows you to view the schedule for the selected Week using the following groupings.
-
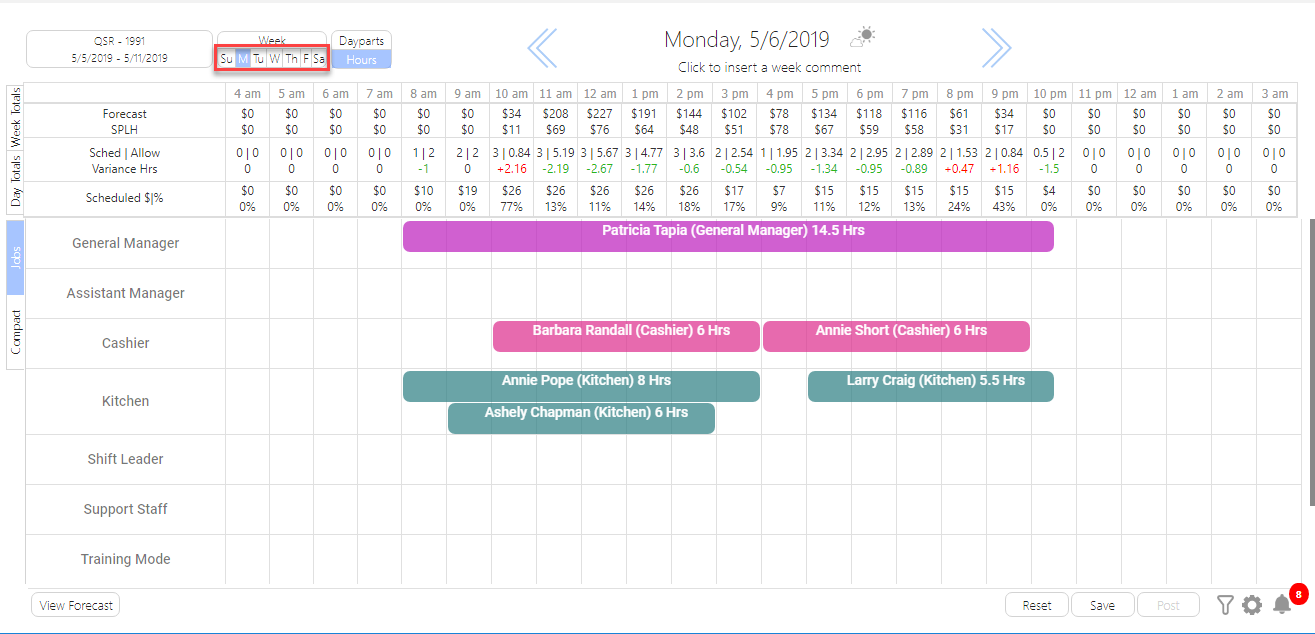
- Day View – This allows you to view the schedule for the selected Day using the following groupings.
- Group by Job
- Compact
- Day View – This allows you to view the schedule for the selected Day using the following groupings.
- Weather
- Week View – In the week view the weather icons are displayed by each of the day headers in the Metrics Grid. Hovering over the icon will display the high/low temperatures for that day. Clicking the icon will open a popup that displays the weather for the week.
-
- Day View – In the Day view the weather is displayed to the right of the date label, and when clicked it displays the weather information for the day that is currently loaded.
Metrics Grid
Depending on the view you are in, view key metric totals by day, daypart, or hourly. The grid is responsive; as schedule adjustments are made the grid automatically updates with the new totals.
-
- Sales Forecast | SPLH – When a POS is connected the forecasted sales will appear on the top row and the sales dollar needed per hour scheduled hours on the bottom row.
- Sched | Allowed (Var) – The total scheduled hours appear on the top row along with the allowed hours and the difference between allowed hours and scheduled hours appears in parenthesis on the bottom row.
- Schedule $|% – The schedule labor dollars and percent for the day.
Each view has a View Week Total tab in the Side Tabs to the left of the metrics grid.
Side Tab Options
These buttons are located to the left of the metric grid and schedule editor. The buttons allow you to change the grouping of the employees within the schedule editor and view the sales totals within the Metrics Grid.
- Week View
- View Week Totals
- Jobs
- Employees
- Day View
-
- View Week Totals
- Day Totals
- Jobs
- Compact
-
Schedule Editor
For details on how to build a schedule see the Building Schedules, discussed later.
- Week View – Shows shifts by the employee (sorted alphabetically by the last name) for an entire workweek. To change to the day view, either click on the abbreviate for the day of the week in the header section or simply click on the date in the Metrics Grid to jump to that particular day.
- Day View – Shows shifts by time for a single day of business. To return to the week view, click the “Week” button in the header.
Footer
In the Web Scheduler footer there are the following buttons: View Forecast, Options, Reset, Save and Send, and Alerts.
- View Forecast – This button will allow you to view/edit the Sales Forecast for the selected week. For details on setting your sales forecast, see the Sales Forecast guide.
- Reset – This button will allow you to reset the schedule to the last saved version, effectively discarding all your unsaved changes. The Reset button only becomes enabled when there are unsaved changes and will alert you with a pop-up prompt that continuing will cause you to lose your changes.
- Save – The button will allow you to save your schedule changes. The Save button will only become enabled if there are unsaved changes.
- Post – This button allows you to post a saved, unposted schedule, which sends each scheduled employee their schedule details as either a text message or email, and makes the schedule visible on the QSROnline Scheduling App.
- Filter – This will open the filter popup, which allows you to select from multiple filtering options – Jobs, Job Classifications, Employees, and Scheduled Employees.
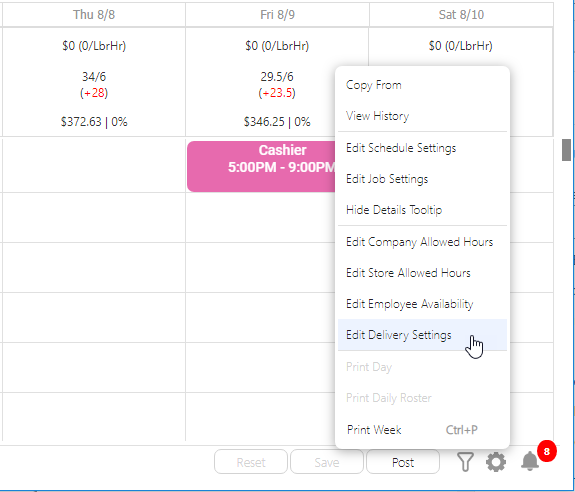
- Schedule Options (Gear Icon)
- Copy From – Once you have created your first few schedules, you can lighten your workload by copying a previous schedule. No need to build a brand new schedule from scratch each week!
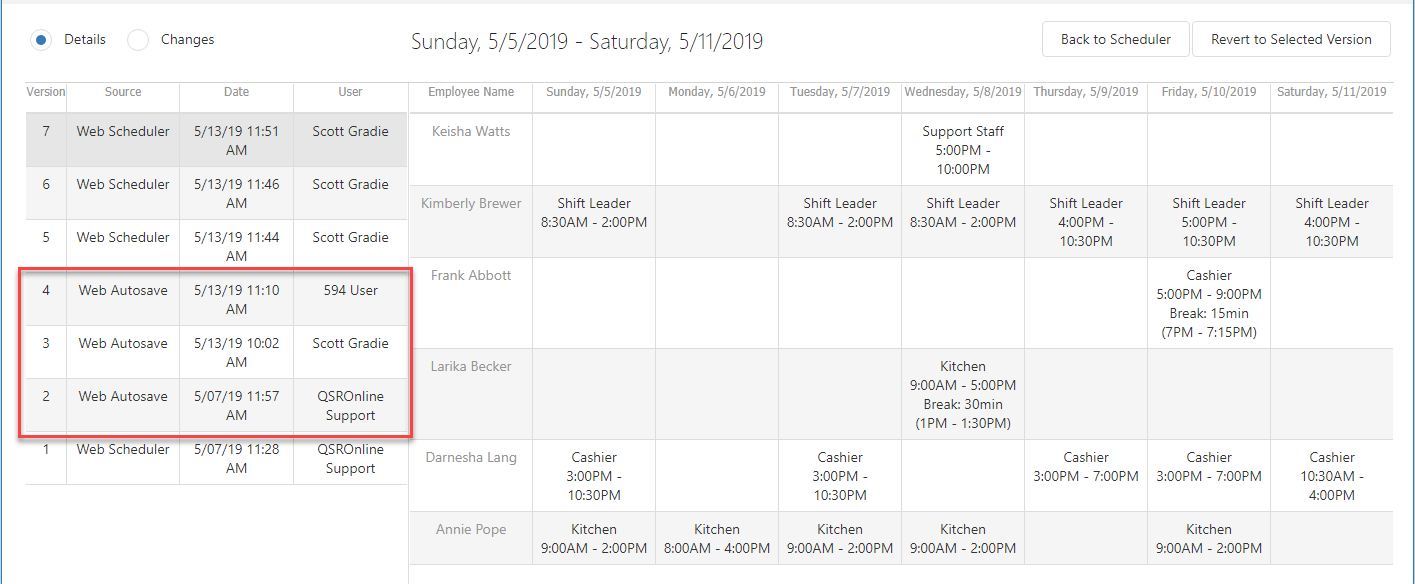
- View History – This allows you to view each saved version of the schedule, and each version is dated and time-stamped by the user. This is a great tool for accountability. See who made what changes in the Schedule.
- Edit Schedule Settings – This will open the Schedule Settings popup where you can change the schedule settings listed below.
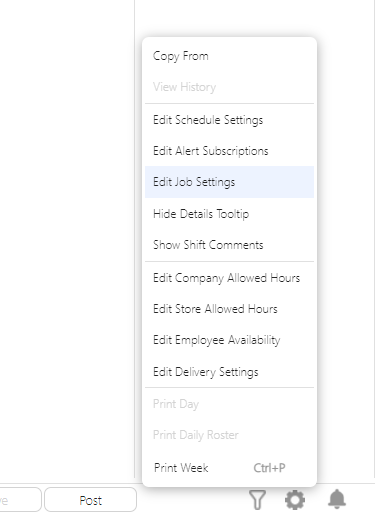
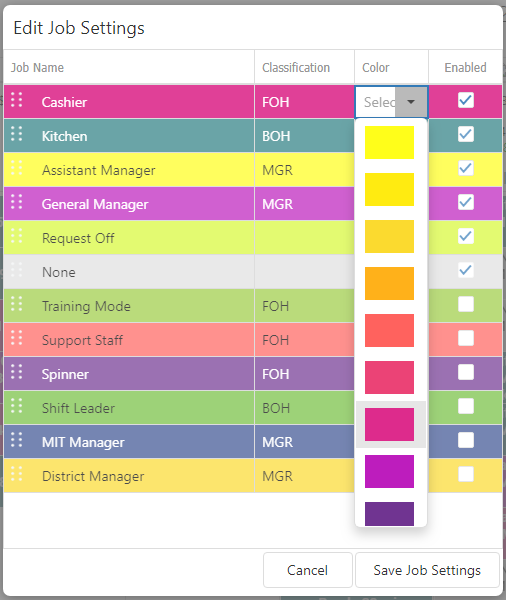
- Edit Job Settings – This will open the job settings editor, where the sort order, visibility, classification, and color of the available job codes can be edited.
- Show/Hide Details Tooltip – This allows you to Show/Hide the Details Tooltip within the Schedule Editor when hovering over any shift.
- Edit Employee Availability – This allows you to set employee availability days and times in Web Scheduler to avoid scheduling conflicts. By default, ALL employees will be labeled as “available” to work at ALL times unless the employee availability is set within Web Scheduler.
- Edit Delivery Setting – Schedules can be emailed, texted, and sent to employees via the QSROnline Scheduling App as a push notification. For more details review the Send Schedules to Employees section below.
- Print Day – This allows you to print the schedule for the selected day. This feature is only available to select when viewing the schedule by Day view.
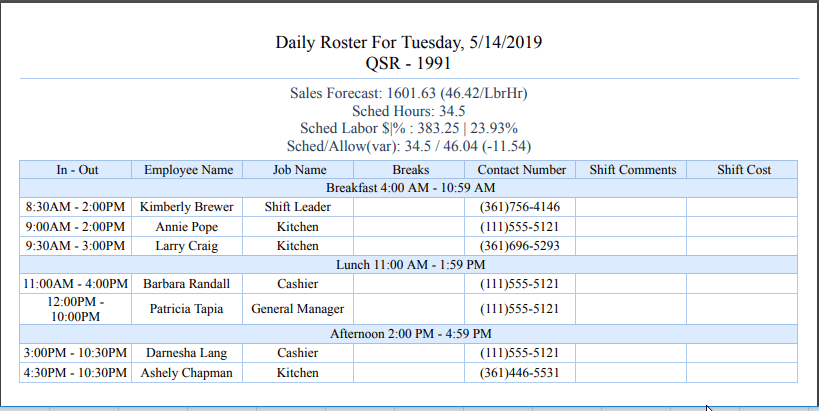
- Print Daily Roster – This allows you to print the daily roster for the selected day. This feature is only available to select when viewing the schedule by Day view.
- Print Week – This allows you to print the schedule for the selected week.
- Schedule Alerts – This will open the schedule alerts popup, where the various alerts can be viewed.
Short Cut Keys
- Up arrow – takes you to the week view
- Down arrow – takes you to the day view
- Left and Right arrows – move between days in the day view
- Ctrl + G – will group or ungroup by job
- Ctrl + F – will open the filter
- Ctrl + P – will print the current view of the scheduler with the filters applied
- Ctrl + S – saves the schedule
- Ctrl + C – copies the selected shift
- Ctrl + V – pastes the shift wherever your cursor is as long as it is a date cell ( no need to select the paste location)
- Delete key – deletes the selected shift
Schedule Setup
If this is the first time you have used the scheduler the following steps are required.
Managing Job Names
The first time you access the scheduler you will need to add each job that can be assigned to an employee. Click the gear icon for the Schedule Options in the bottom-right and Click Edit Job Settings.
When the job settings editor is opened the default job names will be Request Off and None. These settings are saved at the store level, allowing users to pick setting options for each store instead of applying a company default. Please keep in mind, that editing the job settings will impact all other users with access to the store that has been edited.
Add New Job
Click the Add New Job button.
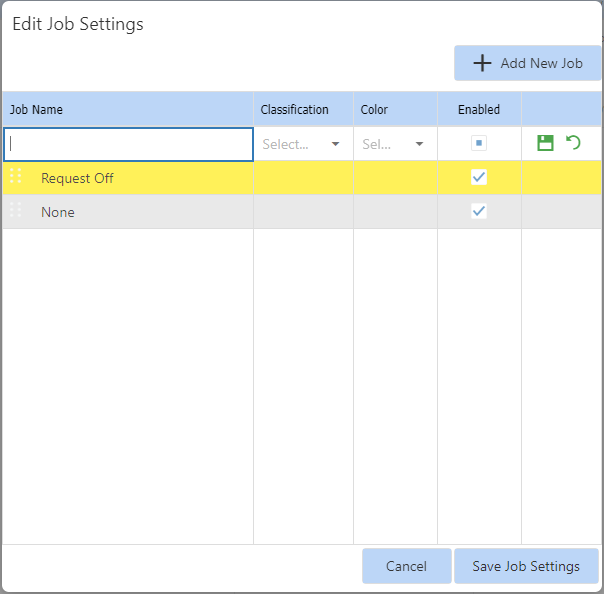
- Job Name (required)- The job will appear on the schedule to assign to employees
- Classification – Classifications can be selected from a list of existing classifications for the store or by typing text in the cell. Classifications are the equivalent of “Departments” for labor scheduling. A common example of popular classifications includes FOH (Front of House), BOH (Back of House), and Bar.
- Color – The color of the job will be shown on the schedule.
- Enabled – If the job is enabled it will appear in the schedule to assign to employees.
The only field that is required is the job name. Once entered click the save icon. Repeat the Add New Job steps until all jobs are entered. Click the Save Job Settings button.
Editing Job
The job settings can be edited by selecting “Edit Job Settings” from the Schedule Options. Any job previously entered can be edited.
Removing the checkmark from the “enabled” checkbox for a particular job code will hide that job from the scheduler, making any shifts that were assigned to that job get reassigned to the job code “none.”
Edit Job Settings Popup
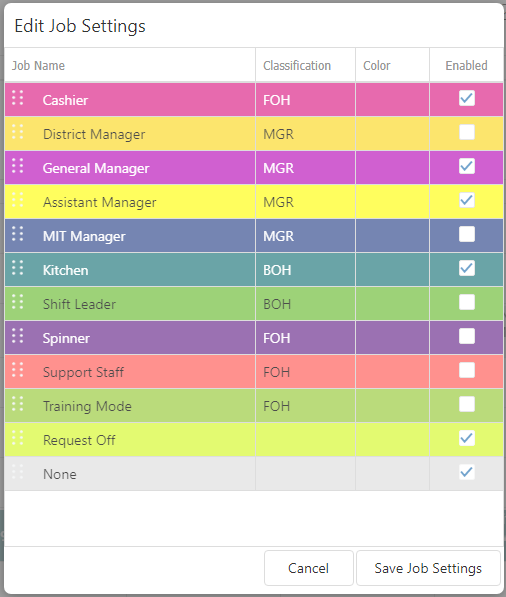
Sort order Can be Changed by Dragging and Dropping Rows
Classifications Can Be Either Selected or Typed
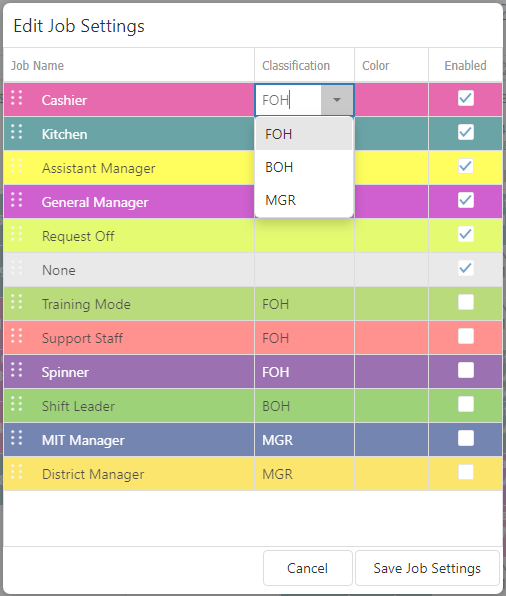
To Change the Color, Click on the Color Cell for the Job Code and Select a New Color from the Dropdown.
Managing Employees
In Web Scheduler, hover over the Schedule Options icon at the bottom of the screen and select Edit Delivery Settings.
Add New Employee
A new browser tab will open listing all of your employees for the location selected. If this is the first time the tab is opened Click the Add Employee button to add your first employee.

Enter each employee’s information. Once complete click Create.
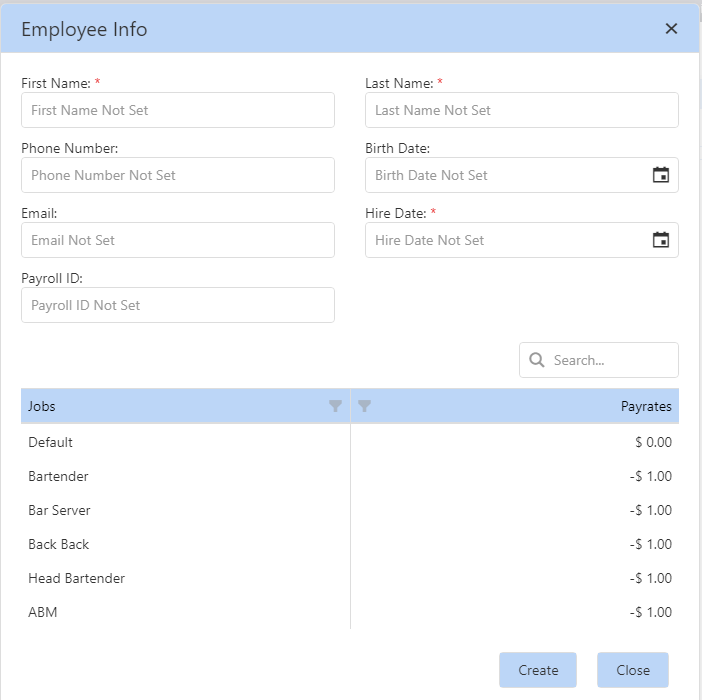
- First Name – Employee first name as it will be seen on the schedule.
- Last Name – Employee last name as it will be seen on the schedule.
- Phone Number – Also, used to send a copy of the “Posted” schedule.
- Birth Date
- Email – Can also be used to receive a copy of the “Posted” schedule.
- Hire Date – The first day the employee will work.
- Payroll ID
- Search – Allows a search of the Jobs listed below.
- Jobs Default Payrate – For the employee’s hours to add labor cost a default pay rate is required. All assigned jobs will use the default pay rate unless a job has an alternate entered.
- Other Jobs Payrate – If an employee requires a different rate when added to the schedule add the pay rate for the specific job.
Edit Employee Information
After a new employee is added you can update any field at any time. The Delivery Settings page has multiple options to sort. You can search by name and click the Edit button next to the employee you wish to edit.

By default, the employee will receive their schedule by text. After the Edit Delivery settings tab is closed please ensure the Scheduler is refreshed.
Remove an Employee
If an employee is no longer at your location you may terminate an employee to remove them and unassign any future shifts.
Click the Edit button next to the employee’s name. Click the Terminate button on the bottom left.
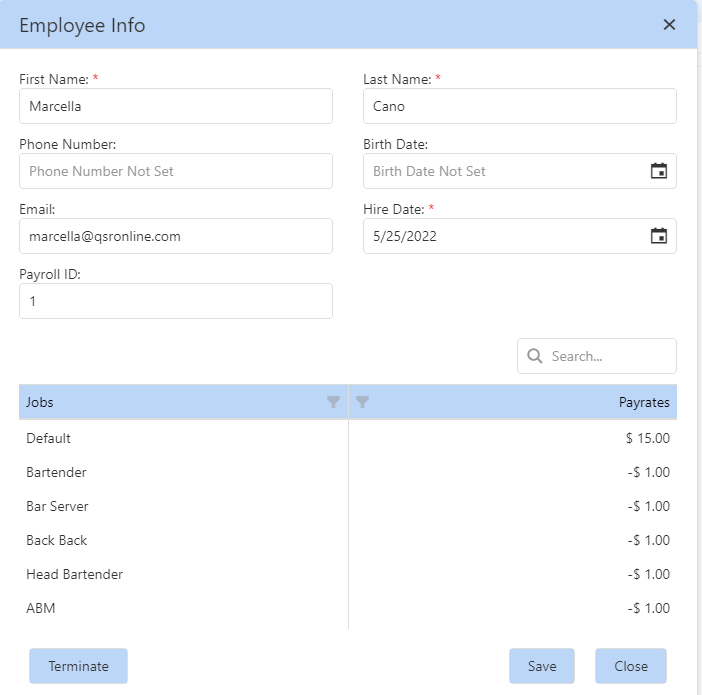
Choose Yes or No to Terminate. If yes, the employee will be removed from the Active list.
Unterminate an Employee
Change the filter from Active to All or Terminate. Click the Unterminate button next to the employee’s name.

Edit Employee Availability
Edit employee availability allows you to involve employees in the scheduling process. Setting their times of availability in the Scheduler will help prevent any scheduling conflicts. Build schedules that not only work for your business but also for your employees. Employees may also set their availability in the Scheduling app which is sent to the Managing app for approval. Employees can still be scheduled outside their availability. An alert badge will appear on the assigned shift. The shift will also appear in Alerts and will be discussed in the Schedule Alerts section.
To set the employee availability select “Edit Employee Availability” from the Scheduler options (gear icon).
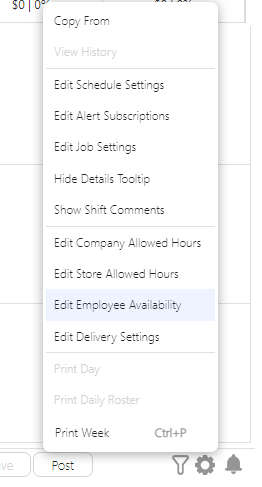
Select an employee from the drop-down and right-click the specific day of the week you are needing to edit the availability for. By default, each employee is “available” for each day of the week. You may also add a daily or weekly hour limit alert.
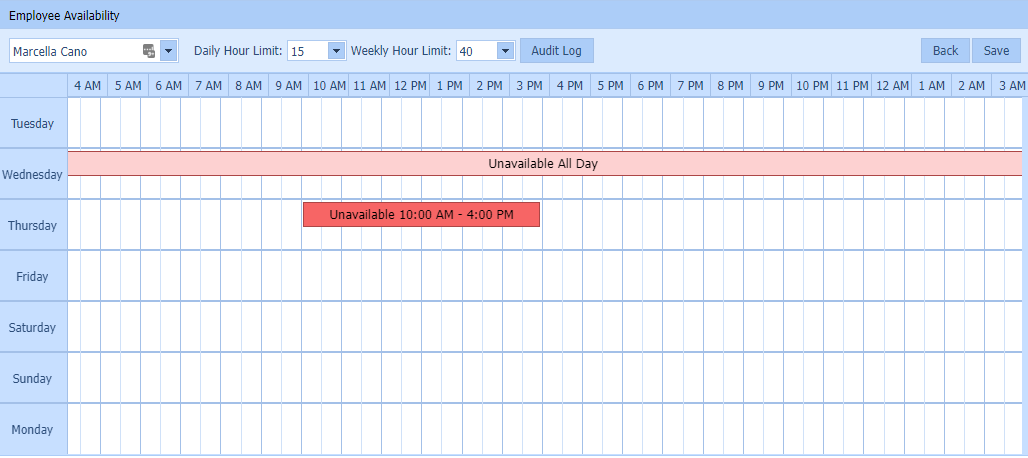
Choose one of the options below from the right-click context menu. Click Save once you have edited the availability for the selected employee.
- Custom Availability: This allows you to edit the Unavailable block to any specific time(s) as needed.
- Available All Day (Default): Employee has no scheduling restrictions and is available all day.
- Unavailable All Day: The employee is not available to work at all for the specific day.
- Available for Daypart: The employee is available to work during specific Dayparts. Dayparts are set during new company onboarding. For more detailed information regarding dayparts, see the Things to Know Before Opening Web Scheduler guide.
- Unavailable For Daypart: The employee is unavailable to work during specific Dayparts.
Building Schedules
Creating New Shifts
New shifts can be created in a number of ways: you can click and drag your mouse across any cell, double click a cell, or utilize the copy shift or copy day feature.
Pro Tip: Save the schedule often. QSROnline will autosave every 28 minutes.
New Shift is created by clicking and dragging the mouse in Day view.
Clicking and dragging your mouse across a specific time range in the day view will populate the shift editor with the highlighted time.
New Shift is created by double-clicking.
Copying Shifts
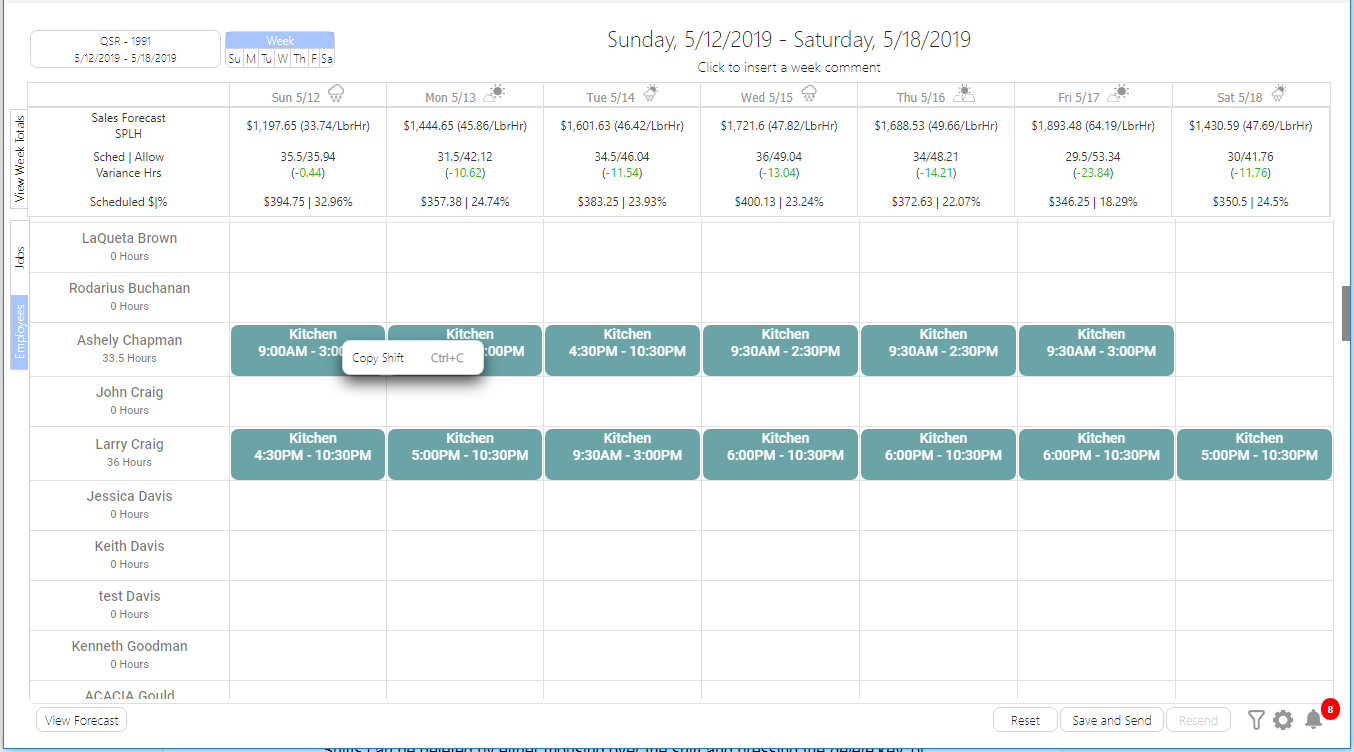
Copying and pasting can be accomplished with the right-click context menu, or by merely hovering over a shift and using the keyboard shortcut combination Ctrl + C and then hovering over any date cell and using the keyboard shortcut combination Ctrl + V. A copied shift can be pasted an indefinite number of times in any view. To COPY a shift, right-click it and select Copy or hover over it and hit Ctrl + C.
Copying Day
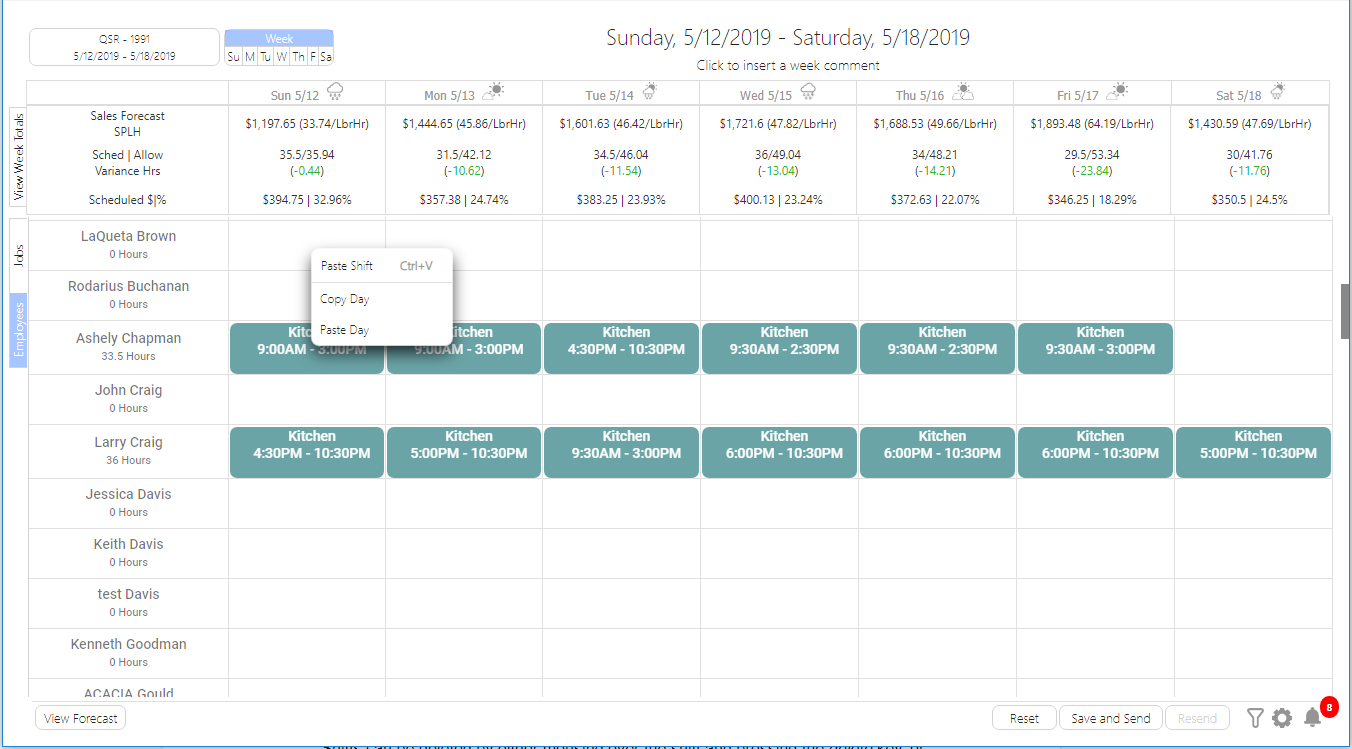
All the shifts in a selected day can be copied to other days by using the right-click context menu options to Copy and Paste Day. Right-clicking an empty cell reveals the context menu, allowing you to Paste Shift, Copy Day, or Paste Day.
Edit Shift Window
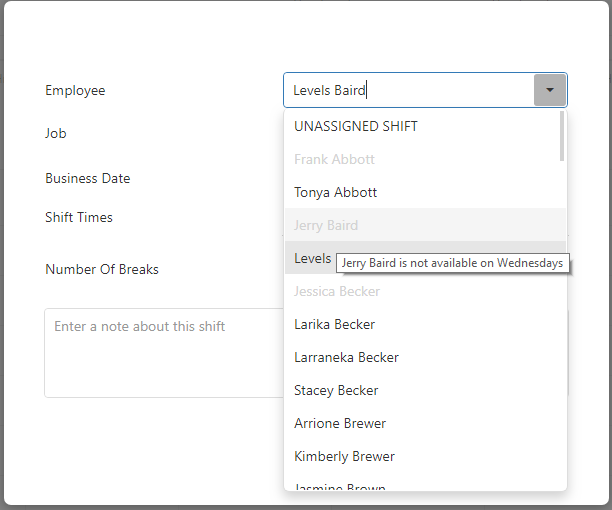
The Employee dropdown will display employees in either green or gray. Green indicates an employee has worked the selected job in the past. Hovering over the text will tell you that the employee has worked the selected job code before. 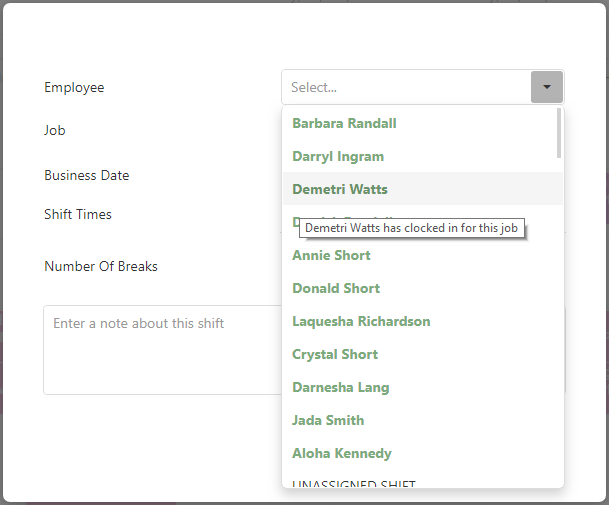 Gray indicates an employee with an availability conflict for the selected day. Hovering over them reveals the employee availability for the day. They can still be selected, but it gives you a visual indicator that the shift may cause an availability conflict.
  The Job dropdown will display recommended jobs for the selected employee in green text at the top of the dropdown list. Hovering over the job description will tell you that the employee has clocked in for that particular job code.
 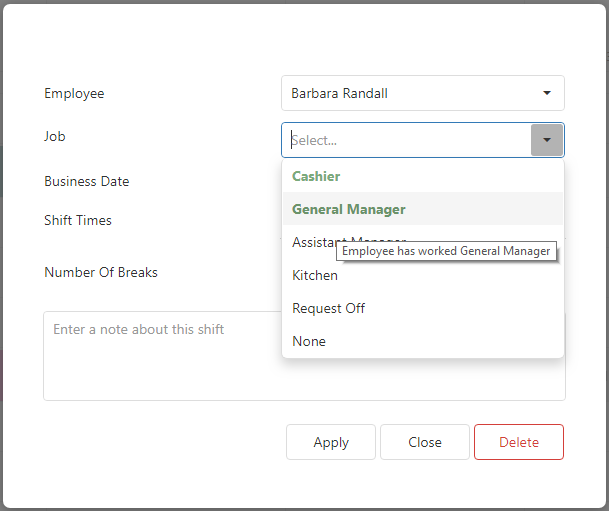 The business date is determined by where you clicked when you created the shift, so you will not be able to create shifts that are outside the viewable week. When you create a new shift you will see an editor that allows you to select the number of breaks that should be included with the shift. After selecting a number from the dropdown, a corresponding number of break editing controls will become visible. The start and end times of the breaks are calculated to disperse as evenly as possible throughout the shift but can be edited along with the break lengths. A new shift will allow you to select the number of breaks between 0 and 4.
 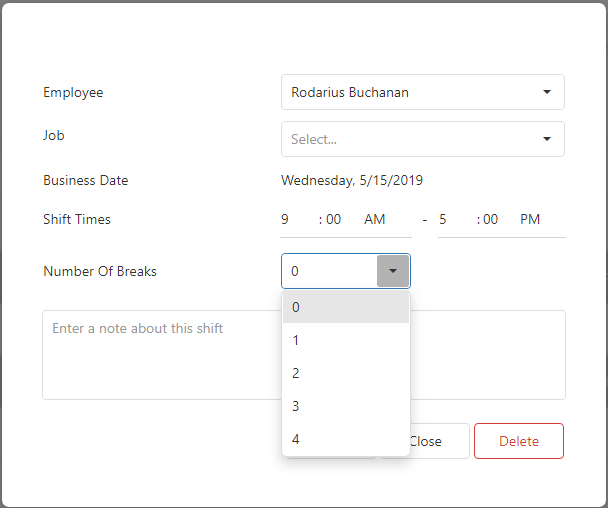 After selecting the number of breaks, the additional break controls will appear.
 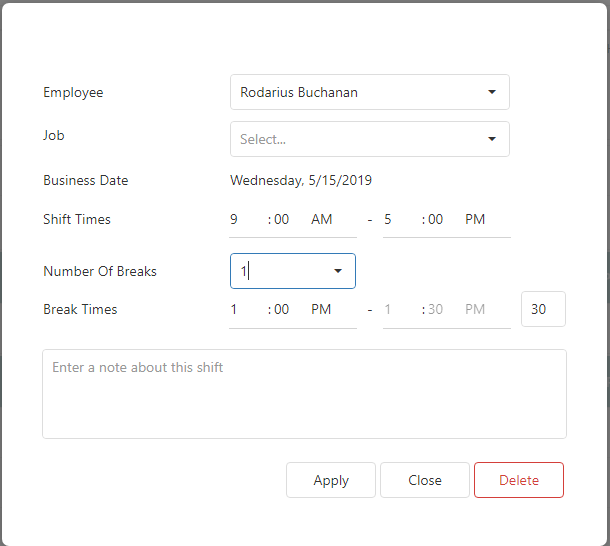 To re-open a shift double click it. The shift editor window will pop up allowing you to make adjustments as needed.
Deleting Shifts
Shifts can be deleted by either mousing over the shift and pressing the delete key on your keyboard or opening the shift and pressing the delete button. 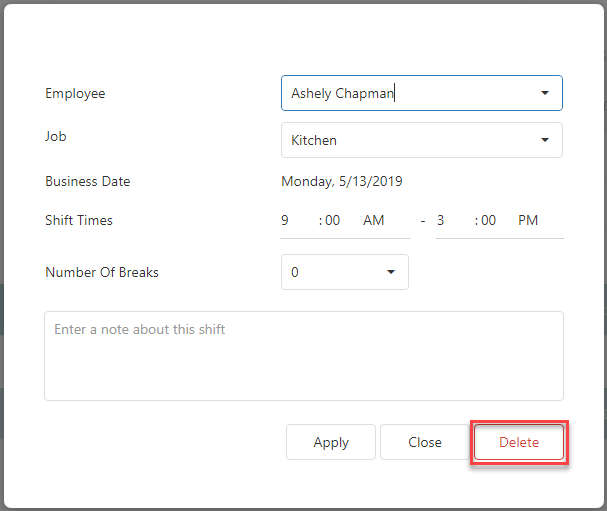
Once your schedule is built, do not forget to click the Save button.
Schedule Alerts
Schedule Alerts advise of any potential conflicts before a schedule is posted for employees. Daily and Weekly shifts now contain a red border that signals the shift has a new alert. All schedule alerts are indicated by the bell icon in the footer with a badge that indicates the number of alerts the currently loaded schedule contains. Clicking this icon will open up the schedule alerts popup, where the various alerts can be viewed.
Click to Zoom The alert types that you will see include:
- Requests Off: These alerts show you all the requests off for the current schedule, and whether or not they have been approved.
- Unassigned Shifts: These are all shifts on the schedule that do not have an employee assigned. Clicking any of these from the alerts grid will open that shift and allow you to reassign the shift to an employee. Shifts will also appear in grey at the top of the schedule.
- Availability Conflicts: These are shifts that cause availability conflicts. Clicking any of these within the alerts grid will open the shift, and the shift alert text at the top of the shift editor will inform you of the employees’ availability for the business date. To update employee availability, see the Edit Employee Availability section.
- Overlapping Shifts: These are shifts that overlap in hours for a given employee. Clicking any of these within the alerts grid will open the shift and allow you to make adjustments or delete the shift.
- Employees approaching their weekly hour limit: These are the employees whose total weekly hours are approaching either their specific limit set on the employee availability page or the default weekly hour limit within the number of threshold hours set in the schedule options.
- Employees over their weekly hours limit: These are the employees whose total weekly hours are over either their specific limit set on the employee availability page or the default weekly hour limit.
- Employees over their daily hours limit: These are the employees whose total daily hours for a given business date are over either their specific limit set on the employee availability page or the default weekly hour limit.
Schedule Alerts popup.  Clicking a row in the alerts popup will reveal all the alerts of that type.
Once all alerts have been reviewed and any necessary adjustments have been made to the schedule, you are ready to send schedules to employees
Post the Schedule
You may save the schedule as often as needed prior to posting the schedule. The “Post” button will make the schedule available to employees. Schedules are delivered to each employee based on the schedule delivery settings. If their phone number is entered they can also view their schedule in the QSROnline Scheduling App.
Click the Save button at the bottom of the Scheduler to ensure all changes have been saved prior to posting. The button will be grey if all changes are saved. Next, click the Post button to send the schedule to employees.
Click to Zoom A pop up will appear listing all scheduled employees, detailing how the schedule will be delivered to them.
Click to Zoom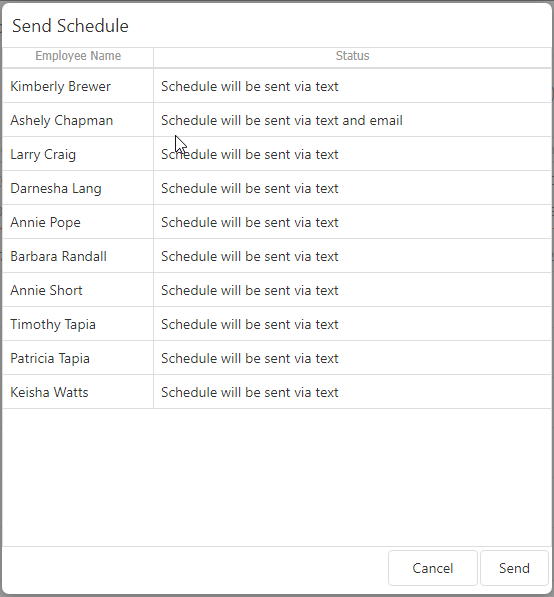 Click Send to send the employees their schedules immediately.
QSROnline Scheduling App for Employees
Employees can download QSROnline’s Scheduling app for free to their smartphones to receive their schedules electronically. Please see the Scheduling App Help Guide for more information.
Schedule Sent by Text
Schedules sent by text message will come from 361-288-2134. Texts sent to this number other than RESEND, STOP, START, or HELP are automatically emailed to the user who sent the last schedule. The available commands are: RESEND – get last schedule STOP – stop service START – resume service HELP – get this message.
Schedule Sent by Email
Schedules sent by email will come from reporter@qsronline.com. If an email is not received please check spam or junk inboxes. It is also recommended to add the email address reporter@qsronline.com to your list of email contacts to prevent schedules from being sent to spam.
Schedule Options
Schedule options are located in the footer by hovering over or clicking the gear button to the right of the filter icon. Depending on your role privileges, some of these features may be restricted by your company administrator. If any options listed in this article do not appear in the schedule options list, please contact your company administrator for questions or assistance.
Gear Icon in the Footer to Access the Schedule Options
The Schedule Options

Copy From
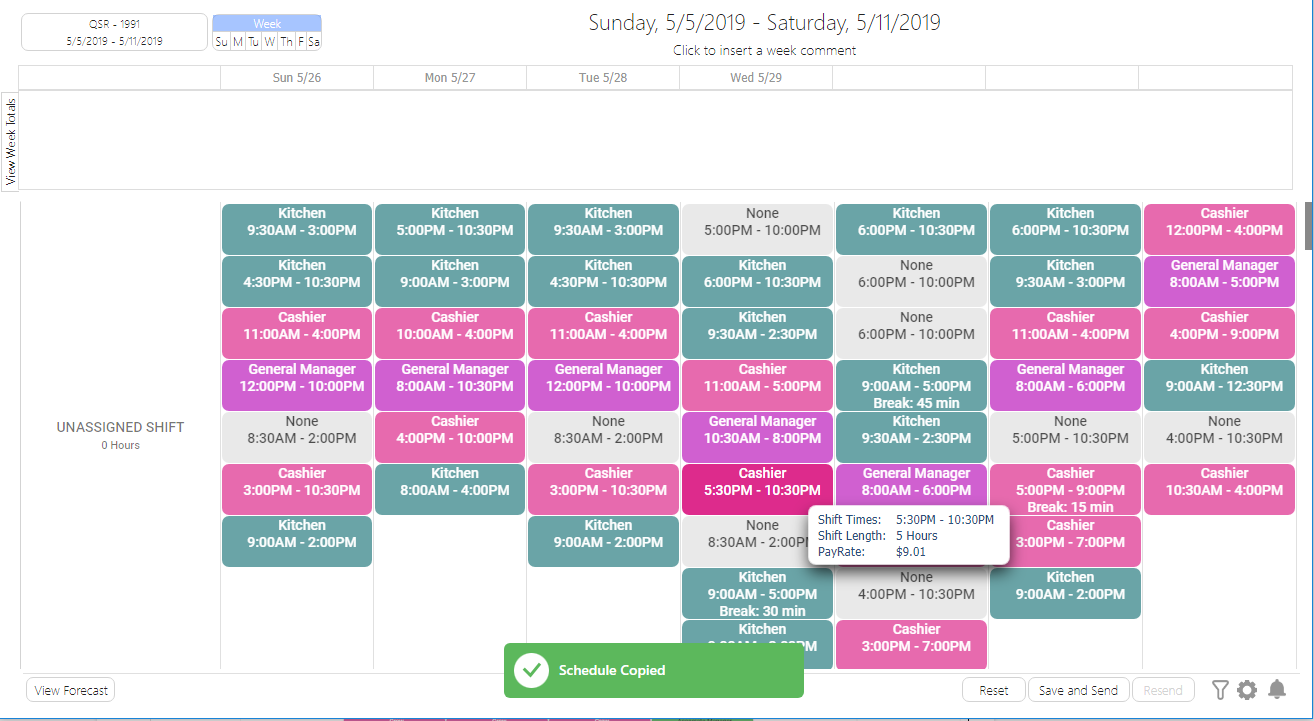
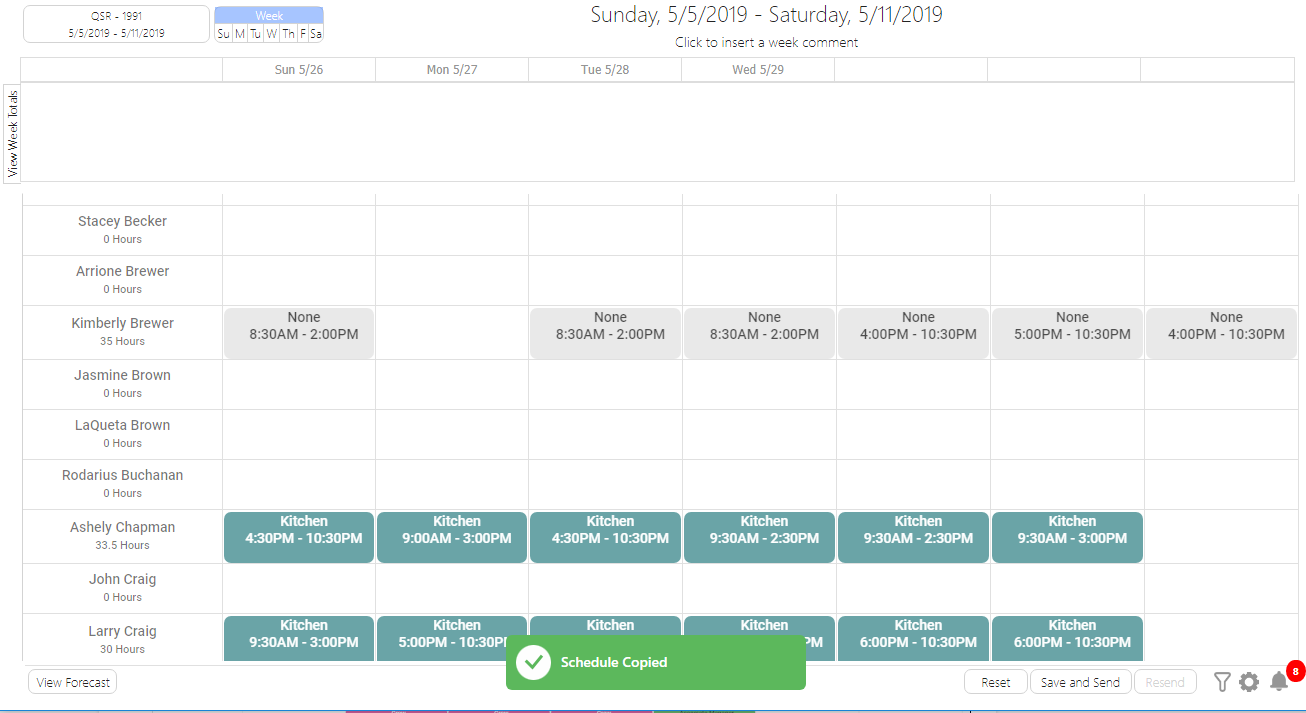
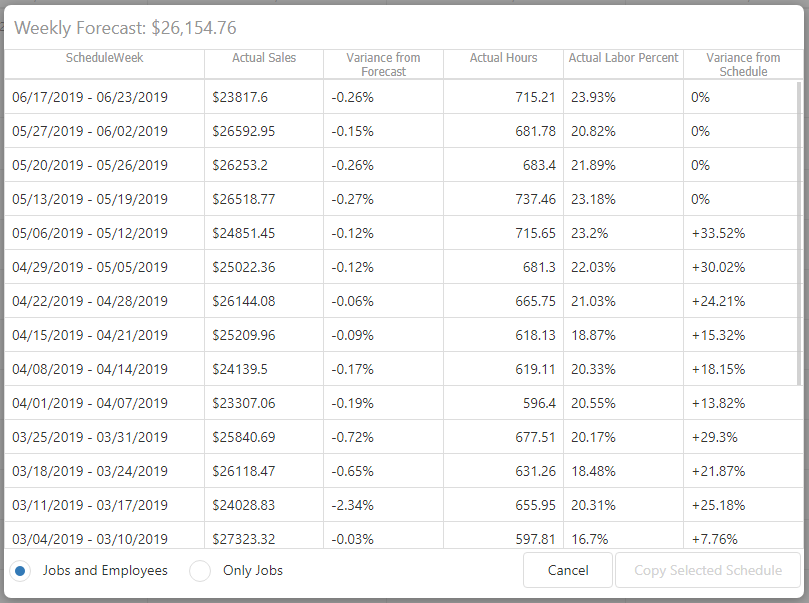
The first schedule option in the gear icon is “Copy From”. If previous schedules have been saved, you have the ability to copy a schedule from a previous week. When “Copy From” is selected, previous schedules are displayed with helpful details such as the actual sales for the week which can be used to compare to the forecasted sales for the week you are building, forecast variance, and schedule variance values. Once you select a previous schedule, you can choose to copy “Jobs and Employees”, the shifts with the employees assigned as they were in the selected schedule, or to copy just the shifts with job codes with the “Only Jobs” option.
The following prompt will appear to open the copy popup when a new schedule is loaded.
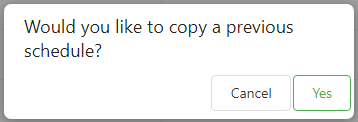
Copy Popup – Select a Previous Schedule to Copy From, with “Jobs and Employees” Selected
Successful Copy of Jobs and Employees from a Previous Week.
Successful Copy of Only Jobs from a Previous Week
View History
The audit history for the currently loaded schedule can be accessed from the gear icon by selecting “View History.” Selecting View History will take you to the schedule history page, where each saved version is listed with its timestamp, source, user who performed the save and the schedule details/changes included in that version.
The source will tell you if the schedule was saved from the desktop, web, QSROnline Managing App (by approving a request off or shift trade) or QSROnline Scheduling App (by submitting a request off). It will also notate if the schedule was saved manually, or if it was an autosave. The schedule history page – autosaves are indicated with the source “Web Autosave”.
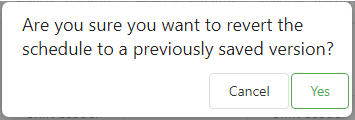
From this page, you will be given the option to revert to a previously saved version of the schedule. After the schedule is reverted, you will be returned to the scheduler page with the details of the selected version pre-loaded and the schedule comment changed to indicate that the schedule was reverted.
View History Window
The Revert to Selected Version Popup Confirmation
The Schedule Comment Changed to Reflect the Reverted Status
Edit Schedule Settings
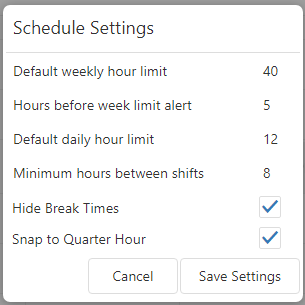
The schedule settings can be edited by selecting “Edit Schedule Settings” from the gear icon. A popup window will display the schedule settings. The following settings can be edited here:
- Default weekly hour limit: this is the default maximum number of hours that you would like employees to be scheduled for during any given week. Any employee scheduled over that number of hours will generate a schedule alert. Weekly hour limits for individual employees can be set in the availability settings page that will override this value for a specific employee.
- Hours before week limit alert: This is the number of hours under the weekly limit that you would like to see schedule alerts for. The purpose of this is to alert you of any employees that are approaching their weekly limit.
- Default daily hour limit: this is the default maximum number of hours that you would like employees to be scheduled for any given day. Any employee scheduled over that number of hours will generate a schedule alert. Daily hour limits for individual employees can be set in the availability settings page that will override this value for a specific employee.
- Minimum hours between shifts: this allows you to set the minimum number of hours that need to exist between any employee’s shifts. This was designed for closing/opening requirements, where an employee can not have shifts less than a certain number of hours apart.
- Hide Break Times: This setting will allow you to either hide or show the scheduled break start and end times in the text message, email, printed schedule, and scheduling app. It is checked by default, meaning that any scheduled breaks will only display the number of break minutes to employees, but if it is unchecked the start and end times will also be shown.
- Snap to Quarter Hour: By default, the behavior of the scheduler is to push the start and end times of the dragged shift to the nearest quarter-hour. This setting allows you to turn off the snap to quarter-hour feature.
The schedule settings popup
Hide Details
Hovering over any shift will reveal detailed information about that shift, including the shift start and end times, the length of the shift, pay rate, the employees’ total scheduled hours for the week, scheduled break times, and any shift comments.
By default, this tooltip is always shown when the scheduler is loaded, but it can be disabled through the gear icon by selecting “Hide Details Tooltip.” To turn it back on after it has been disabled merely return to the gear icon and select “Show Details Tooltip.”
Details Tooltip Shown by Hovering Over Any Shift.
For requests off it will also display when the request off was submitted, whether or not it has been approved and the reason supplied by the employee from the QSROnline Scheduling App.
Details Tooltip Shown When Hovering Over a Request Off.
Audit Log
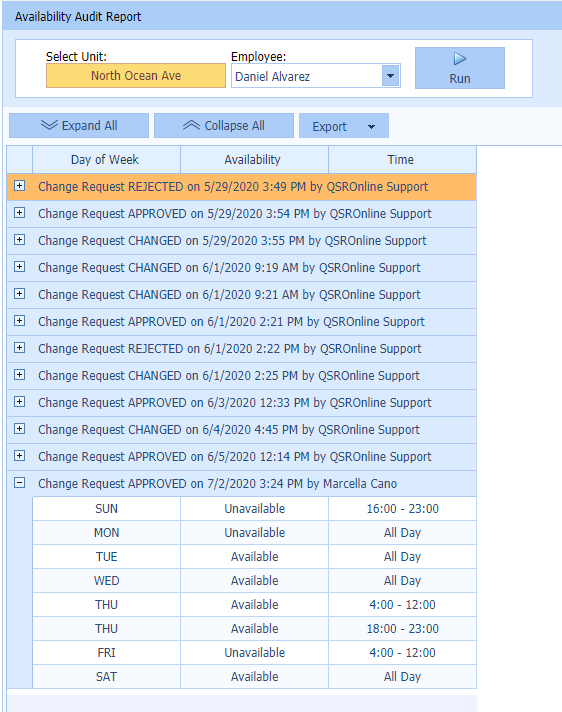
The audit log lists the history of employee availability changes.
Change Status Options
- Rejected – The request was rejected.
- Approved – The request was approved.
- Changed – A change was completed in the Scheduler or through the Managing app.
Printing
There are three formats available for printing the schedule: Print Day, Print Daily Roster, and Print Week. Selecting any of these The Print options will generate a PDF for easy download and printing. To access the print options, select the appropriate print option in the gear icon.
Print Day
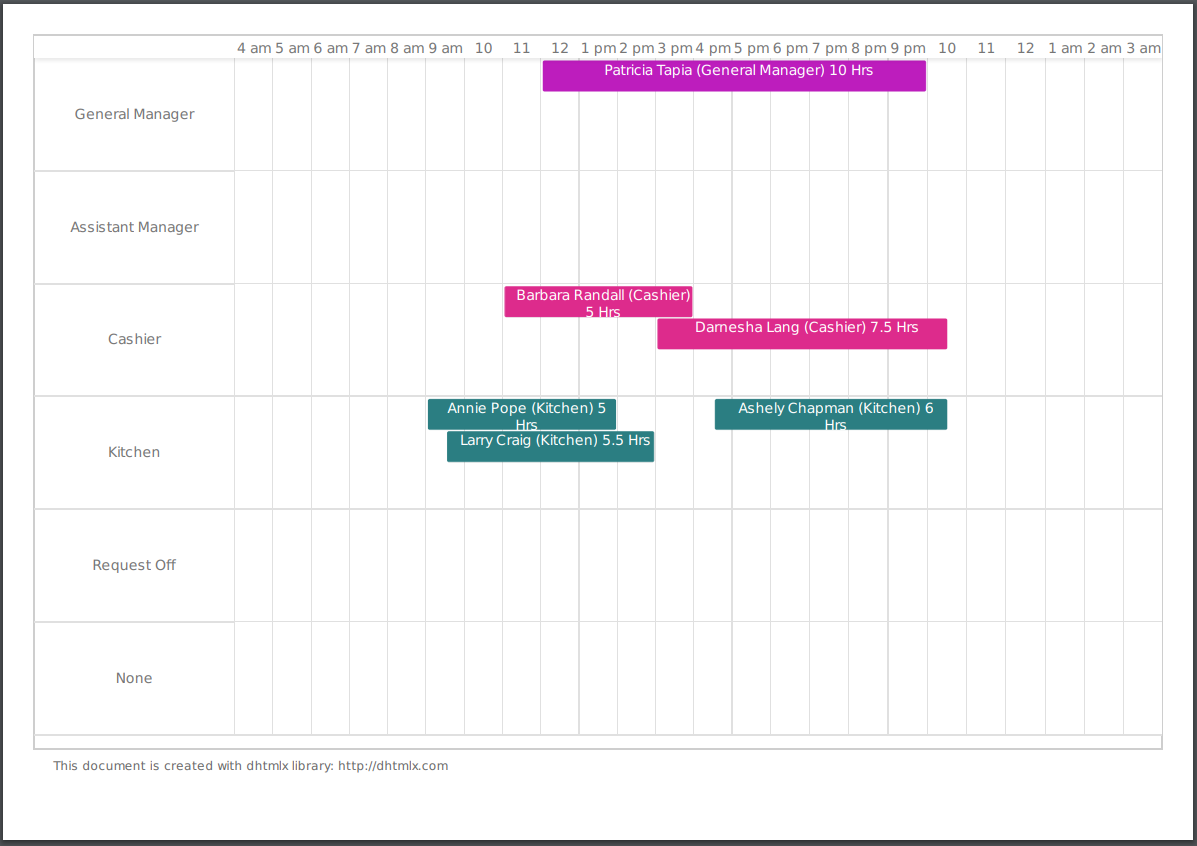
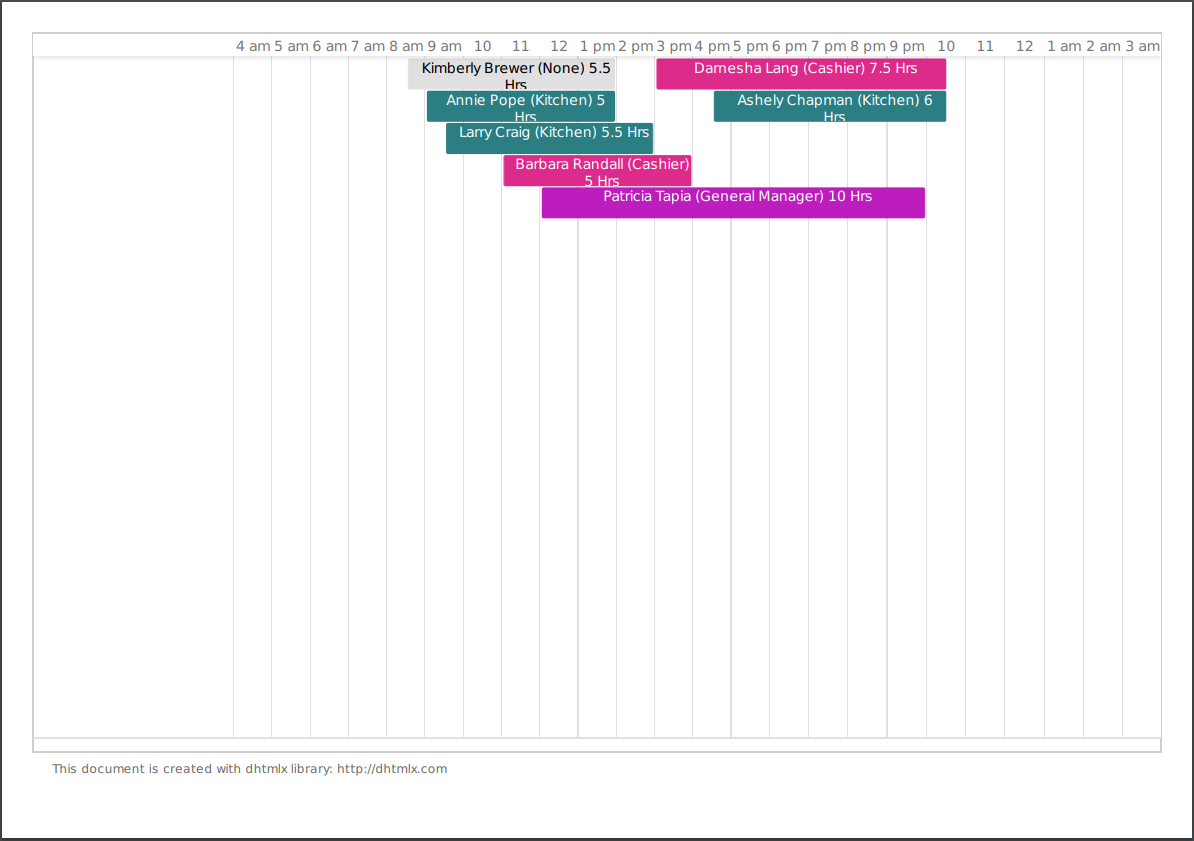
Print Day prints the timeline for the selected day. This prints the shifts as they appear on the scheduler’s daily view for the currently loaded day and will reflect whether or not the shifts are grouped by job or are in the compact view.
Print Day with the shifts grouped by job code.
Print Day with the compact view selected.
Print Daily Roster
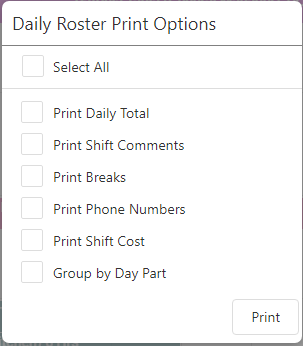
“Print Daily Roster” will open the roster print options allowing you to select your printing preferences. Selecting print will generate a PDF of the roster with the selected items applied for the day that is currently loaded.
The Daily Roster print options.
The Daily Roster print with the option selected.
Print Week
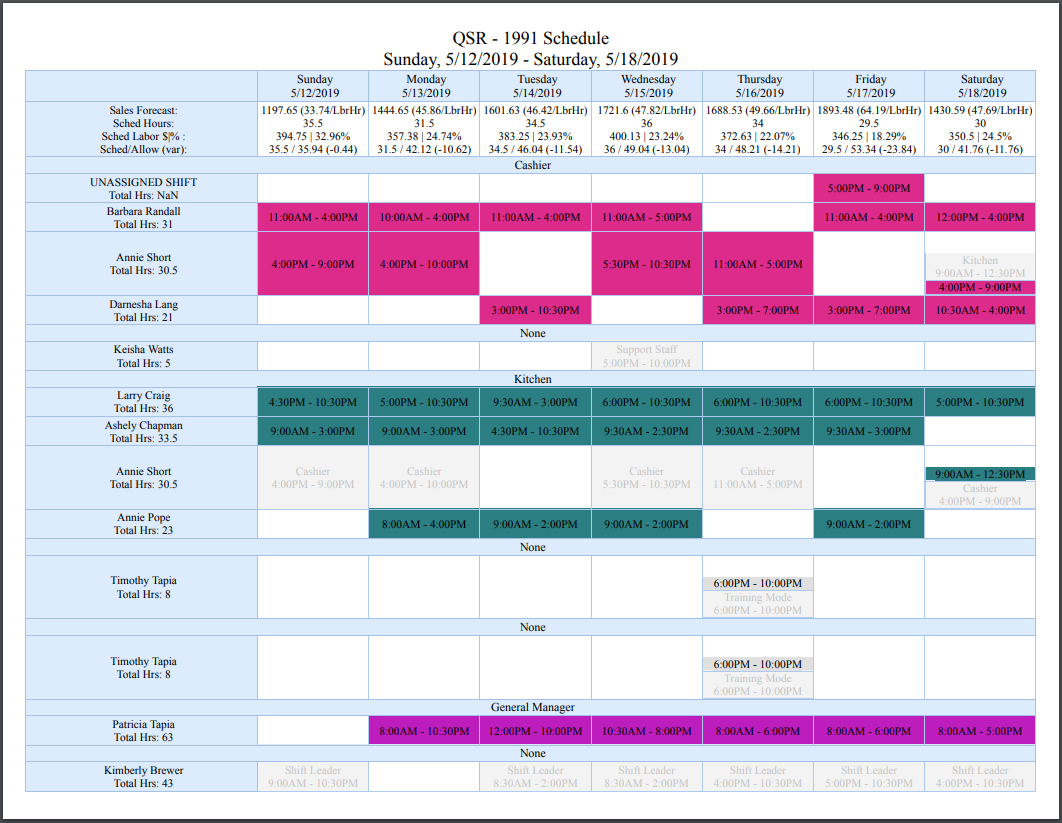
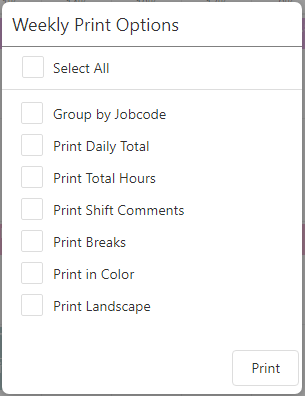
The week can be printed from any view by selecting “Print Week” from the menu or by using the shortcut key combination Ctrl + P. The week print options will popup allowing you to choose your printing preferences. After selecting the desired options and selecting ‘Print’, a PDF document will be generated and downloaded.
The print options popup.
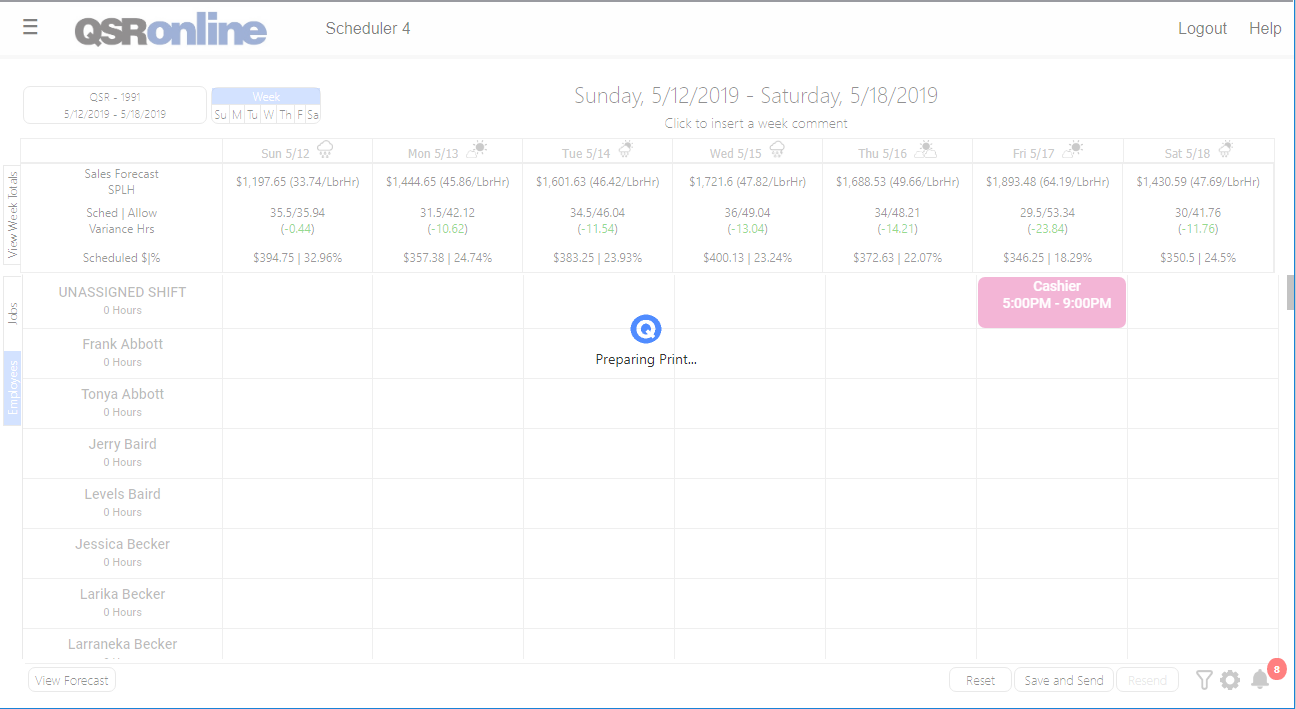
The loading message is displayed while the pdf is being generated.
The print PDF is generated with all options selected.
