
Order Templates offer the ability to create an unlimited number of customizable formats for the Order Guide. For example, multi-region operators may decide to create one template for each region that includes only the vendors specific to that region. Bar and Grill concepts may choose to have one template for the kitchen and a separate template for the Bar. If desired, one template could be created and customized by store.
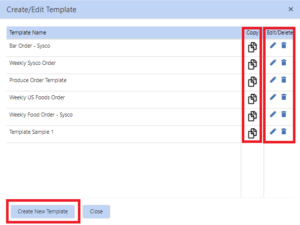
To access the Order Templates, click the “Create/Edit Template” button in the bottom right hand corner of the screen. If this button is not visible, contact your QSROnline Administrator to request access.
Pre-saved Order Templates can be copied to start a new template. Templates can be edited or deleted by selecting the appropriate icons. To create a brand new blank template, click the “Create New Template” button.
In the example below, we will create a new template.

Name the order template in the “Template Name” text field at the top, center of the window.
The bottom half of the window is broken into two sections:
- Settings Section – right hand side of the window
- Formatting Section – left hand side of the window
Since some of the settings affect formatting, configure the Order Template’s settings on the right hand side of the window before using the formatting section on the left hand side of the window. The “i” icon tooltips appear throughout the window for guidance.
Settings Section [02:13]
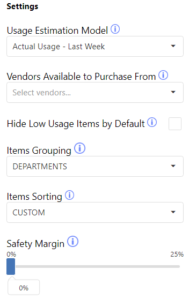
Usage Estimation Model
Select how many weeks of historical data should be used to estimate suggested orders. QSROnline uses the actual food cost usage from the selected inventory items to estimate how much product is currently on hand and how much product will be used through the cover through date.
Vendors Available to Purchase From
Select all the vendors that should be available to order from on the selected template. This feature allows users to create one order, even if the items will come from different vendors. When the order is saved, there will be one row for each vendor on the “Order Window”. The separate vendor order rows will share the same “Created By” and “Submitted On” information since they were generated from the same Order.
Hide Low Usage Items by Default
For items such as paper goods, spices and chemicals that have a very low actual food cost usage percent on a weekly basis, it may be desirable to hide these items from the default “Ordering Window”. This would force end users to know in advance that they need to order more of the product before sitting down to place the order.
In the formatting section of the “Order Template” window, the “Low Usage Threshold” can be set for specific items. If for example an item has an average actual food cost usage percent of .1%, then setting the threshold to .2% will automatically flag the inventory item as Low Usage. When the Hide “Low Usage Items by Default” check mark is selected, items below their “Low Usage Threshold” will not show in the order list by default. Users can view low usage items using the toggle button at the top left hand corner of the “Create Order Window”.
Items Grouping
Inventory items can grouped together in the Order Guide format in one of three ways:
- Departments
- Departments/Subdepartments
- Custom
With all three “Item Grouping” options, the groups can be reordered using the “Rearrange Groups” button in the formatting section of the “Order Template Window”.
For items grouped by “Departments” or “Departments/SubDepartments”, the inventory item configuration will be used to determine which group the item will appear under. The groupings will automatically be created based on the list of inventory items added to the format. If the “Departments” or “Departments/Sub-Departments” group is not visible after adding inventory items, it is because none of the inventory items selected are reported under the missing “Departments” or “Departments/Sub-Departments”. With both of these settings, items can not be moved into another group in the “Order Template” window without changing the “Items Grouping” setting to “Custom”.
When the “Custom” grouping option is selected, the “Add Item” button changes to “Add Group”. Name the group in the “Enter New Group Name” field at the top left hand corner. Then proceed to add inventory items to the new group.
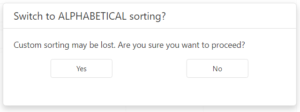
If a format is built using “Custom” Items Grouping, and the setting is changed to “Departments” or “Departments/SubDepartments”, then a pop up will appear notifying the user that “Custom” grouping formats will be lost and will not be recoverable.

For guidance creating or editing a “Departments” or “Sub-Departments”, see the “Edit Departments & Sub-departments” section of the Food Cost Configuration – Inventory article.
To change the “Sub-Department” an inventory item is reported under, see the sections related to “Editing and Creating a New Inventory Item” in the same Food Cost Configuration – Inventory article.

Items Sorting
Items within a group can be sorted either “Alphabetically” or “Custom”. If a format is built using “Custom” Items Sorting, and the setting is changed to “Alphabetical” Sorting, then a pop up will appear notifying the user that “Custom” grouping formats will be lost and will not be recoverable.
Safety Margin
The “Safety Margin” increases the suggested item quantity by the selected percentage to provide a safety buffer. Safety margins help avoid running out of an item if the sales volume was higher than forecasted or in the event of higher waste than average.
Formatting Section [06:06]

Dynamic Add Group/Item Button
Depending on the “Items Grouping” selection in “Settings”, the add button in the top left hand corner of the “Formatting Section” will either say “Add Group” or “Add Item”. When a new template is created, the “Items Grouping” defaults to “Departments”. For the “Departments” as well as the “Departments/SubDepartments” grouping settings, the “Add Item” button will display.
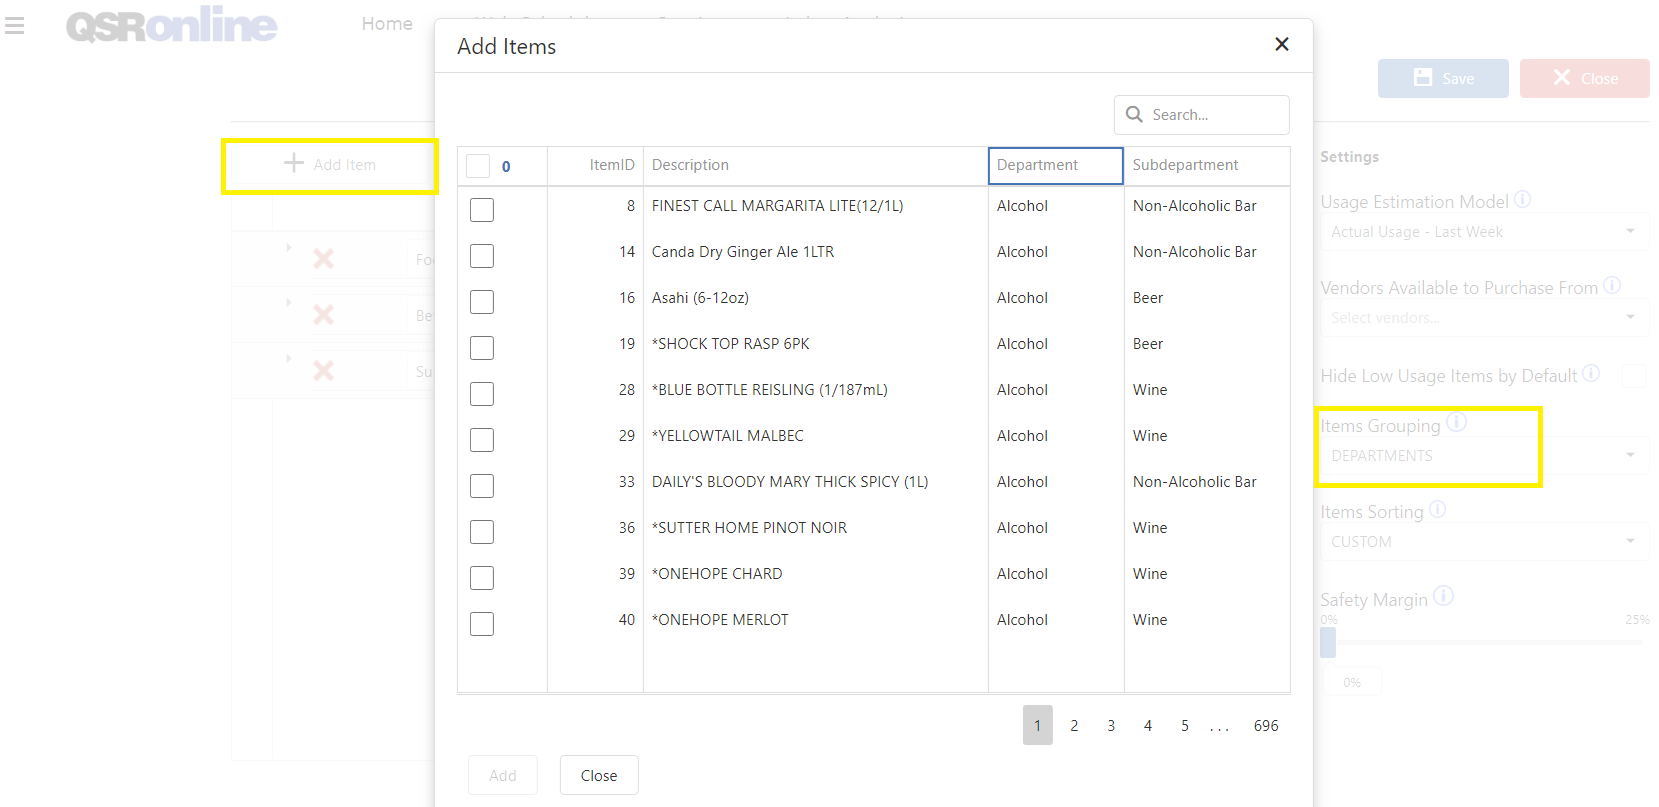
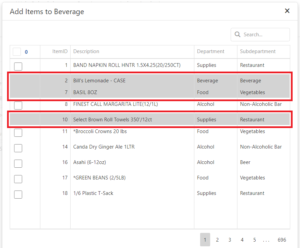
Just like countsheets, items are added in the same order in which they are selected. The search field in the top left hand corner will search all columns. For example, you can search by “Inventory ItemID” number, “Description”, “Department” or “SubDepartment” to narrow the list. Once all items have been selected, click the add button.
The groupings will automatically be created based on the list of inventory items added to the format. If the “Departments” or “Departments/Sub-Departments” group is not visible after adding inventory items, it is because none of the inventory items selected are reported under the missing “Department” or “Department/Sub-Department”.
When the “Custom” grouping option is selected, the “Add Item” button changes to “Add Group”. Name the group in the “Enter New Group Name” field at the top left hand corner. Then proceed to add inventory items to the new group. A new group must have at least one item in it before it can be created. Otherwise, the “Add” button in the bottom left hand corner will be greyed out.
Rearrange Groups
Reorder the groups inventory items are housed under using the “Rearrange Groups” tool. Drag and drop the icon on the left up or down to move the selected group.
Expand All/Collapse All
Select “Expand All” to see the inventory item list under all groups, or “Collapse All” to hide the inventory item list and only see the groups.
Search
Use the “Search field” in the top right hand corner to find a group or inventory item that has already been added to the template format.
Delete Groups
To delete a group, click the X icon in the row for the desired group.
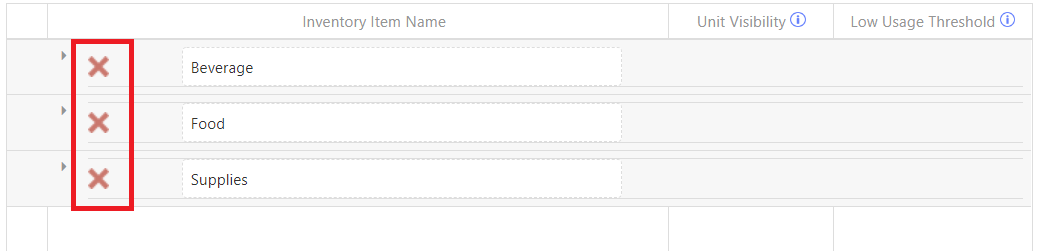
Please note, deleting a group will delete all inventory items from the format as well. Inventory Items can then be added back to a different group using the “Add Item/Add Group” button. A confirmation box will appear asking to proceed with deleting the group and all items belonging to it. Click “Yes” to proceed or “No” to cancel.
Add/Delete/Move Inventory Items within a Group
To delete an Inventory Item from a group, click the Red “X” in the selected row. Please note, a group can only exist if at least one inventory item is added to it. When deleting the last inventory item in a group, a confirmation box will appear asking to proceed deleting the selected inventory item AND the group it belongs to. Click “Yes” to proceed or “No” to cancel.

The ability to add or move inventory items within a group is dependent upon the “Items Grouping” and “Items Sorting” setting selections. Please note, unlike countsheets, an inventory item can only exist in one group in the order template format. Inventory Items rows filled with grey and without a check box have already been added to the order template format. These items must be deleted from the group they are currently in to be added to another group.
Items Grouping – Departments or Departments/SubDepartments Setting Selection
If the “Departments” or “Departments/SubDepartments” setting is selected, the only way to add a new Inventory Item to the format is to use the “Add Item” button in the upper left hand corner of the Formatting Section. See the “Dynamic Add Group/Item” button section above for more detailed information.
Items Grouping – Custom Setting Selection
If the “Custom Setting” is selected, then items can be added in the process of creating a new group using the “Add Group” button in the upper left hand corner of the Formatting Section. See the “Dynamic Add Group/Item” button section above for more detailed information.
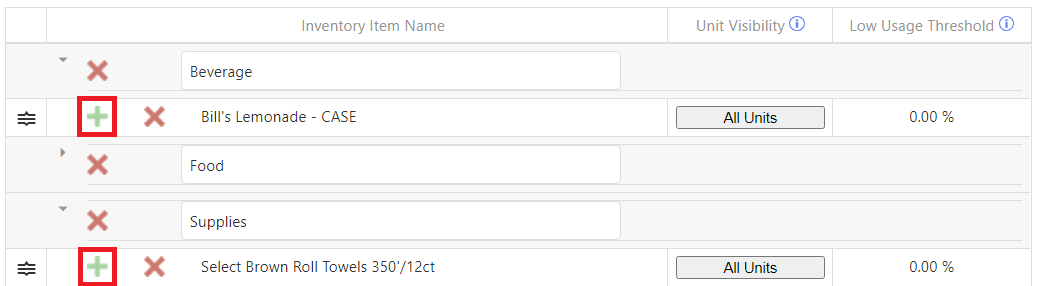
Items can be added to a pre-existing group when the “Custom Setting” is selected. Expand the desired group you wish to add the Inventory Item to. Click the green “Plus Sign” icon to open the Inventory Item List. Just like countsheets, items are added in the same order in which they are selected. The search field in the top left hand corner will search all columns. For example, you can search by Inventory ItemID number, Description, Departments or SubDepartments to narrow the list. Once all items have been selected, click the “Add” button.
Item Sorting – Alphabetical
If the “Alphabetical Setting” is selected, inventory items will automatically be arranged in alphabetical order within a group. The items can not be moved.
Item Sorting – Custom
If the “Custom Setting” is selected, items can be arranged using the icon on the far left of the formatting section. Expand the desired group. Drag and drop the icon on the left up or down to move the selected group.
Unit Visibility
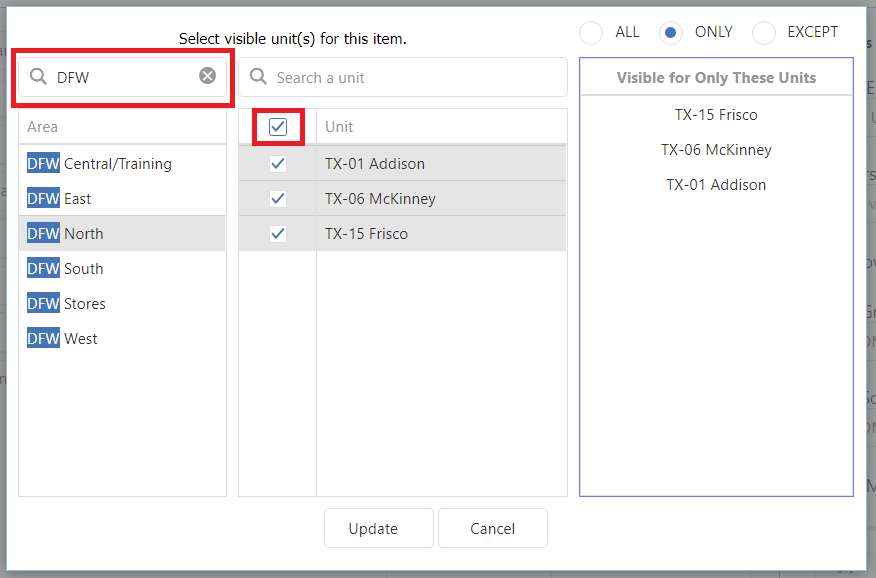
There may be times when a specific inventory item should only appear on the order template format for select locations. Applications for this feature may include test items that are only available at a handful of stores or regional LTO’s. In any case, the “All Units” button can be configured by specific inventory item so only the appropriate stores will see the item on their Order Guide. Click the “All Units” button for the desired inventory item.
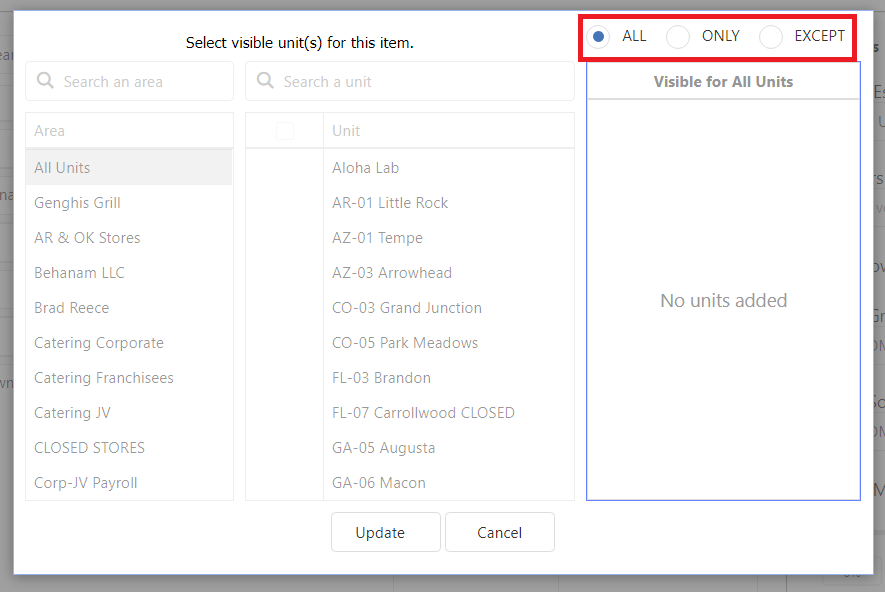
Before selecting any units, use the radio buttons in the top right hand corner to designate what logic to use for the unit selected. By default “All Units” will be selected. By clicking the “Only” radio button, the panel on the right side of the pop up window will change to say “Visible for Only These Units.” Clicking the “Except” radio button will change the right side of the pop up window to say “Visible for Only These Units.”
Once your desired logic has been selected, use the “Unit” list to add the desired stores to the unit list on the right side. To quickly see all stores within a particular area, search for and select the desired area. The unit list in the center of the pop up window will be filtered to only show stores within the selected area. The “Checkmark” box at the top of the list will select all stores, or pick and choose just the stores you prefer.
Low Usage Threshold
In the formatting section of the “Order Template” window, the “Low Usage Threshold” can be set for specific items. If, for example, an item has an average actual food cost usage percent of .1%, then setting the threshold to .2% will automatically flag the inventory item as Low Usage. When the “Hide Low Usage Items by Default” check mark is selected, items below their “Low Usage Threshold” will not show in the order list by default. Users can view low usage items using the toggle button at the top left hand corner of the “Create Order” window.
To set the threshold for a particular item, simply click in the percent field in the “Low Usage Threshold” column for the desired item. Type in the “Actual Food Cost %” that the item must exceed in order to show on the default order guide page.
Save and Close
When all desired changes have been made to the Order Guide Template, click the “Save” and “Close” buttons to exit back to the “Order Summary” window.