Objective – To show the features available within a Web Countsheet
Within a Countsheet

- The Countsheet Date will automatically populate to the beginning of the work week for Weekly Countsheets or beginning of the month for Monthly Countsheets.
- “Last saved by” shows the last user to save the countsheet as well as the date and time it was saved.
- The “Expand/Collapse Groups” button will expand/collapse each category.
- “Item Search” allows you to search for a specific item on your countsheet using the search box.
- To “Save”, “Print”, or “Close” your countsheet, use the corresponding button(s).
- The “More” button has additional options that are detailed in the next step.
- Your locations or departments are listed here. Click the “Plus” sign next to each category to expand and show all items within the category.
More Button
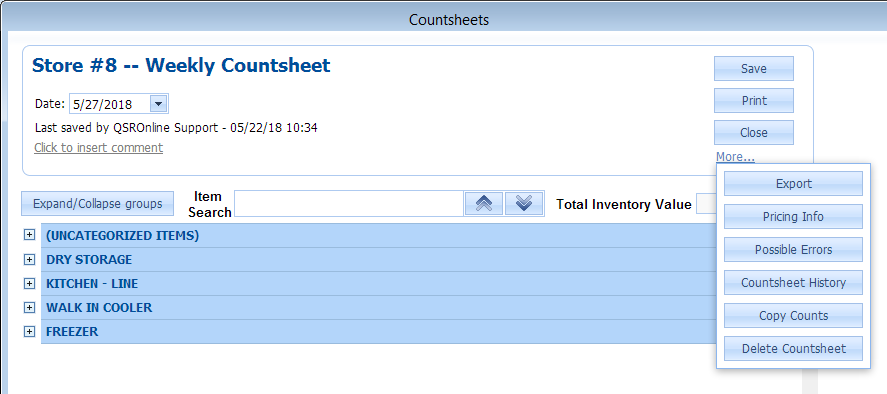
- Export – Allows an export on all countsheet types to excel.
- Pricing Info – Shows latest prices and mapping details.
- Possible Errors – Details any items that may have possible errors.
- Countsheet History – This link allows you to view older versions of the same countsheet. Administrators can use this feature to see who has edited an existing countsheet as well as the times it was edited.
- Copy Counts – Allows Admin to copy a countsheet into another countsheet type.
- Delete Countsheet – To delete the selected countsheet, click on the delete button. (This is an Administrator function only).
Exported Countsheet
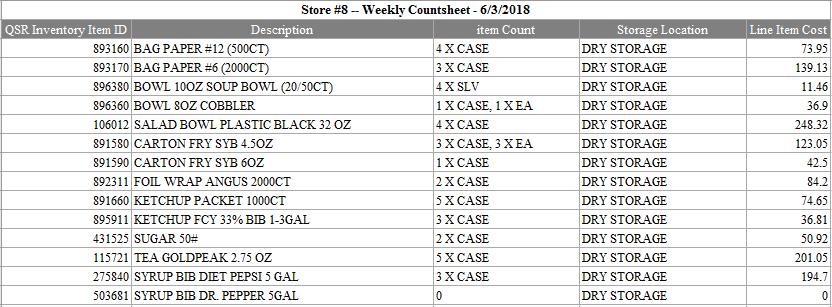
The view of an exported countsheet.
Printing a Countsheet

To print a countsheet, select your countsheet and click the “Print” button.

This window displays of a preview of the countsheet prior to printing. Click the “Print” button at the top left of the window to print the countsheet.
Uncategorized Items

“Uncategorized Items” are inventory items that are formatted to display on the selected countsheet type but are not found within a Location on the countsheet. When customizing a countsheet, users have the ability to add and remove inventory items from the selected countsheet type. Anytime an inventory item that is formatted to show on the selected countsheet type has been deleted from the countsheet, it will show under “Uncategorized Items” on the next countsheet.

To prevent this from happening, you can change the countsheet type that the inventory item is formatted to display on in the Food Cost Configuration > Configure Inventory > Inventory Items.
Click on the inventory item that is needing to be edited, which will populate the Edit Inventory Item window. Select the drop down menu under Show on Countsheets. Remove the checkmark next to the countsheet types you wish to remove the inventory item from.