The QSROnline Scheduler 2.0 provides the tools needed for your managers to create schedules quickly and easily. They can toggle between daily and weekly views all the while keeping on top of their forecasted labor percent.
Previous Article
View Sales Forecasting Scheduler 2.0
Different Scheduler Views
The QSROnline Scheduler 2.0 has two views when creating a schedule. Get Started by going to Tab 2 – Edit Schedule.
- Time Line View – A daily view that includes an easy to use drag and drop editor for adding and making schedule adjustments.
- Spreadsheet View – This view shows the weekly summary by the employee while keeping the key metrics for schedule review available.
Time Line View
When opening the Edit Schedule tab the first view is Time Line View. This view is best used to make daily schedules. You can quickly and easily adjust or add schedules with drag and drops tools. You may also select the date with the Go To Date drop down.
Grid Options
In the Time Line, there are many options to assist with schedule making.
Grouping by Job Code – Seen below.
Show Day Totals – Will show the summary of each day of the schedule for the full week. Clicking a day on the calendar will switch the Time Line to show shifts for that date.
Show Metrics Grid – This checkbox will show/hide the hourly sales and labor breakdown. Allowed Hours are visible based on the total sales in each hour. The Var Hrs will compare scheduled to the Allowed Hours total.
Show Day Part Totals – Groups day part scheduled vs allowed hours.
Hourly Metrics- Change the Allowed Hours grid to the following options:
- Scheduled / Allowed Hours – Standard view comparing scheduled hours vs. allowed hours based on sales dollars. The Variance hours will adjust to green if less than suggested, white if matching, or red if over the allowance suggested.
- Sales / Labor Hour – Sales per Labor Hour/ or Sales Per Man Hour. This is the number of employees scheduled vs. Projected Sales.
- Labor Percent – Calculates the Scheduled Labor dollars by the Forecasted Sales dollars.
Hourly Metrics Grid – The Metrics Grid breaks down hourly sales projections by hour. This amount is taken from the the forecasted sales and uses the same average for each hour that has sales. The Labor Hours Scheduled/Allowed will appear if the Allowed Hours template is filled out. See Allowed Hours Setup.
Grouping by Job Code
You can choose to view the schedule according to job codes by checking the box next to Group By Job.
Adding Shifts
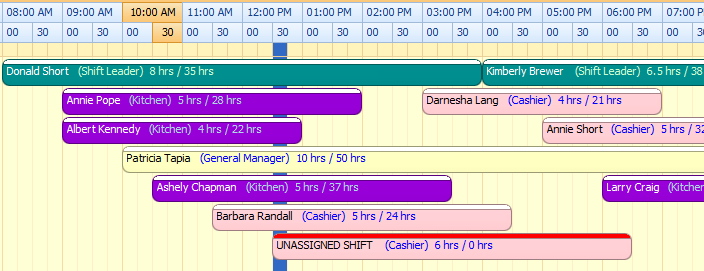
Add a shift by double-clicking a blank place in the Time Line where you want the shift to begin. Choose the employee and Job in the drop down. You may edit the start and end time and employee comments. Click OK to add the shift.You will see the color-coded job added to the timeline. Also, note the shift totals and total hours the employee is scheduled to work.
Adjusting the shift
You can easily adjust the duration and start/end times of the shift by using the drag & drop features. Simply click on the shift and drag it to the appropriate start time. Shorten or lengthen the shift by hovering over the end of the shift until the double-sided arrow appears. Then, click and drag the end to the appropriate time.
You may also make adjustments by double clicking the shift to bring up the New Shift window to reassign, edit start/end times, delete, or changes job codes.
Shifts Appearing in Red
The first type of shifts with a red line are shifts that are marked as unassigned. It is a shift created but has not been assigned to an employee. If an employee is not assigned it will appear on the possible errors tab as a reminder.
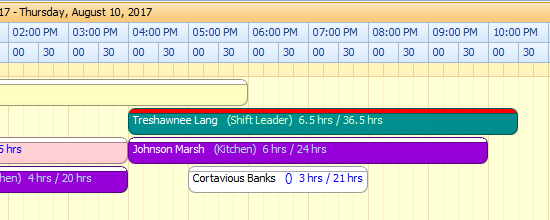
A shift that shows red with an employee name indicates an employee who has been terminated prior to this date. This shift should be deleted or reassigned to an active employee.
A Complete Schedule
A completed schedule will look something like this. You can see each job code is differentiated by color. To edit a shift, simply double click it or right click it. Use the drag & drop feature to move, shorten, or lengthen shifts.
Looking at the timeline above the schedule, you can see your sales projections and projected labor hours. Looking at the variance labor hours shows where you may need to make scheduling adjustments in order to meet labor goals.
Spreadsheet View
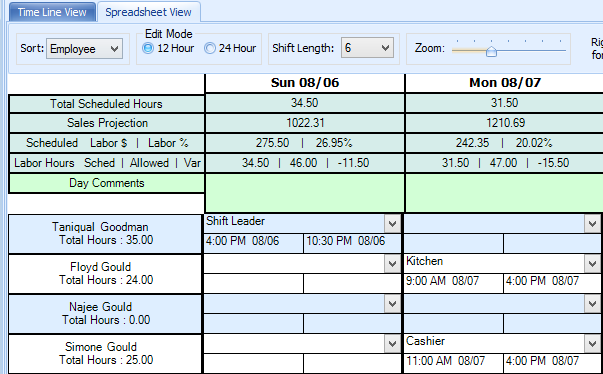
QSROnline offers an alternate view for creating a schedule, known as the Spreadsheet View. This view provides a weekly overview of each employee. You can see the weekly total by the employee. By default, the list of employees is sorted by the last name alphabetically.
Grid Options
Sort By – Sort the Spreadsheet View alphabetically by employee name or by Job Code.
Edit Mode – Choose to see time in/time out by the 12 or 24-hour format.
Shift Length – Change the default shift when adding a new shift.
Zoom – Zoom the Spreadsheet View in or out.
Daily Totals – Each day has the detail of the Total Hours Scheduled, the daily Sales Projection, and the Scheduled Labor Dollars and Labor Percent.The Labor Hours Scheduled and Allowed will appear in the Allowed Hours template is filled out. See Allowed Hours Setup.
Employee Details – Each employee will show the total hours scheduled for the week.
Adding A Shift
This version acts much like an excel sheet. To assign an employee a shift choose the employee, find the day of the week, use the drop down to select the job, and enter the start time. The shift will default to the length list as the Shift Length default number. You can edit the start or end time.
Right-Click Options
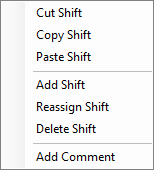
You may also right click to view additional shift options.
Cut Shift – Will remove the shift from the current schedule but is copied to paste in another schedule.
Copy Shift – Will copy the shift and allow to paste to another schedule.
Paste Shift – Will use the Cut or Copied shift and apply to the day/employee chosen.
Add Shift – If an employee needs to be scheduled for more than one shift per day use this option to separate the start and end times.
Reassign Shift – A list of employees will appear to move the selected shift.
Delete Shift – Will remove the selected shift.
Add Comment – Add a comment to the employee shift.
Shifts Appearing in Red
Shifts highlighted in red indicate an employee who has been terminated. The shifts should be deleted or reassigned to an active employee.


