Allowed Hours provides a theoretical labor guideline. This tool offers an hourly guideline in the Metrics Grid for your managers to follow as they build their schedules showing them how many labor hours they should schedule each hour based on their labor targets and projected sales. Allowed Hours can be customized by location or for all locations.
There are three models available for Allowed Hours:
- Labor Percent Model (Default)
- Sales Per Labor Hour Model
- Maximum/Minimum Model
Accessing Allowed Hours
To access the Allowed Hours settings in the scheduler, click the ‘gear’ icon in the bottom right corner of the screen.
You can select Edit Store Allowed Hours for individual stores if your stores vary significantly in sales volume or select Edit Company Allowed Hours to set allowed hours for the entire company.
The Allowed Hours grid model will open in a new tab.
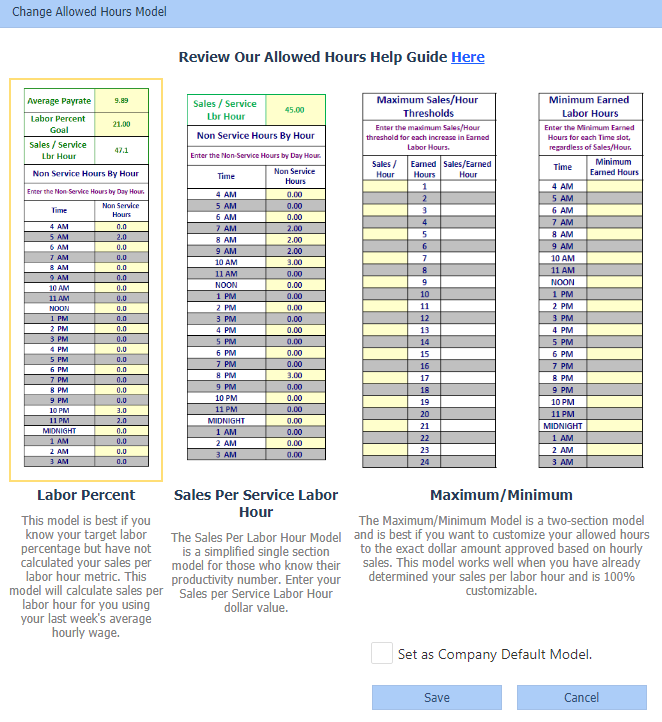
Changing Allowed Hours Model
The current Allowed Hours model selected will automatically load with any current company or store settings displayed. You can adjust the model selected by store or company based on your user’s access level. Click the Change Model button in the top-right corner.
The model that is currently selected will have a yellow highlight. Click the new Allowed Hours Model then click Save.
Things to Note:
- Any historical values stored will be deleted when changing to a new model. (If there are no new saved changes you can switch back and retain old settings.)
- Unit settings will override the company default. If the “Set as Company Default Model” is selected it will not change a location that already has settings saved.
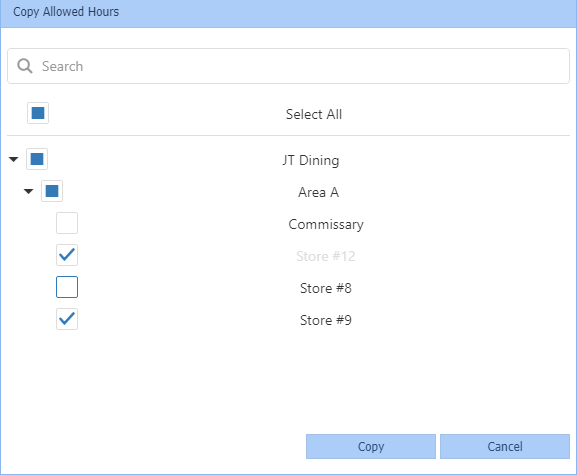
Copying the Allowed Hours Model
Once parameters are set for one location, you can choose to copy parameters to other stores, areas, or the whole company. Click the Copy button in the top-right corner. Checkmark the location(s) that you would like to copy Allowed Hours settings to and click Copy. Note: The “copy to” list is based on your users’ current access level.
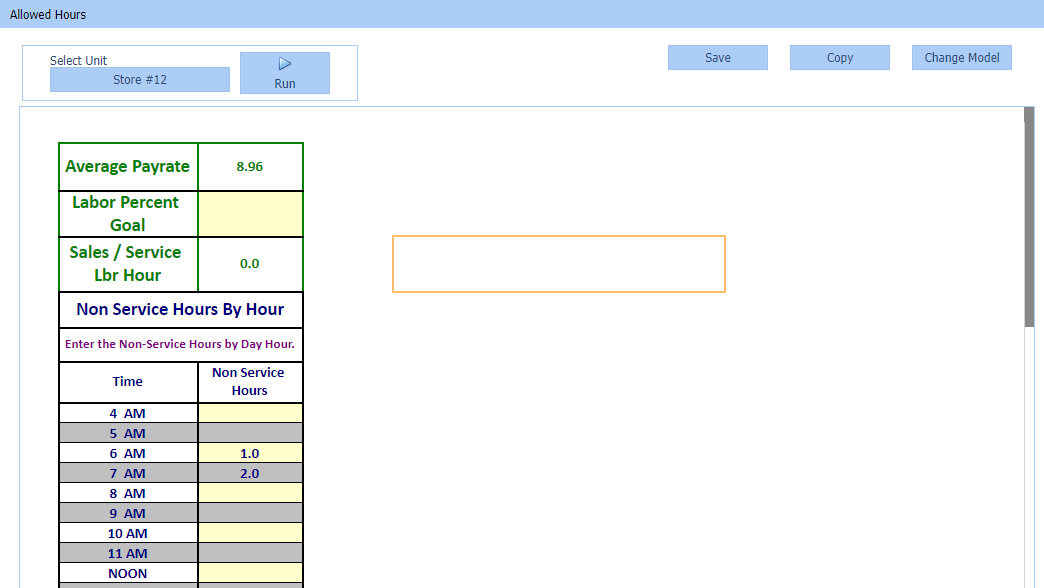
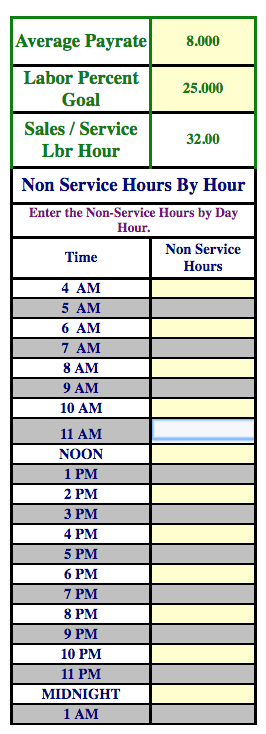
Labor Percent Model
This model is best if you know your target labor percentage but have not calculated your sales per labor hour metric. This model will calculate sales per labor hour for you.
The Average Payrate is calculated from the last full week of labor and is automatically updated. (Note: If you would like to set the average pay rate please email support@qsronline.com) Enter your Labor Percent Goal. The Labor Percent Model will calculate your sales per service labor hour (productivity number).
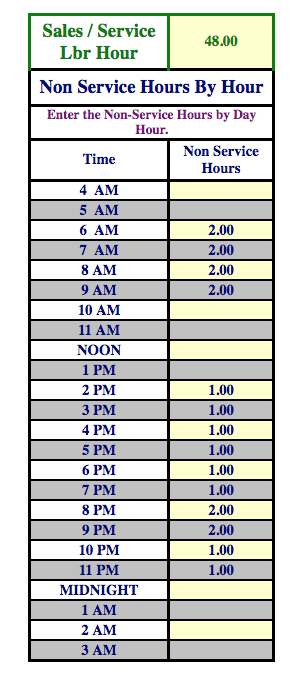
Non Service Hours By Hour allows you to set a minimum number of people who should be on for prep duties before open or clean-up crew after close irrespective of whether there are forecasted sales for those hours.
Sales Per Service Labor Hour Model
The Sales Per Labor Hour Model is a simplified single section model for those who know their productivity number. Enter your Sales per Service Labor Hour dollar value.
Non Service Hours By Hour allows you to set a minimum number of people who should be on for prep duties before open or clean-up crew after close irrespective of whether there are forecasted sales for those hours.
Maximum/Minimum Model
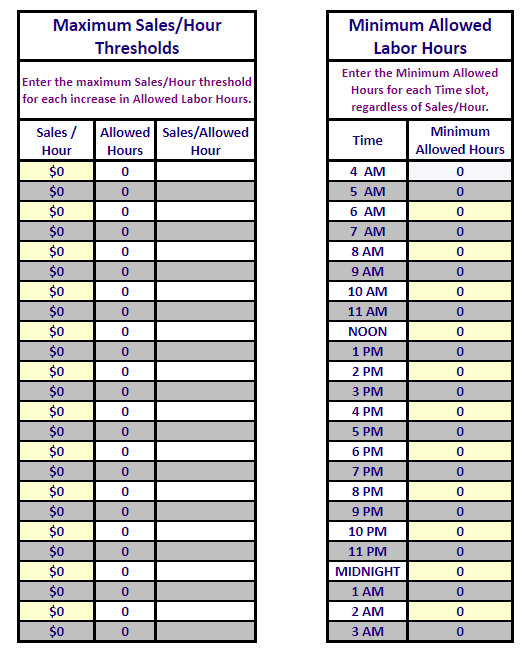
The Maximum/Minimum Model is a two-section model and is best if you want to customize your allowed hours to the exact dollar amount approved based on hourly sales. This model works well when you have already determined your sales per labor hour and is 100% customizable.
The first section allows you to set the Maximum Sales Per Hour Threshold Matrix. There are three columns in this section:
- Sales per Hour – this is a manual entry field
- Allowed Hours – this is a static number of how many employees can be scheduled
- Sales per Allowed Hour – this field is calculated by the Maximum Sales per Hour Thresholds Matrix
The second section in this Minimum Allows Hours Matrix. This allows you to to set a minimum number of people who should be on for prep duties before open or clean-up crew after close irrespective of whether there are forecasted sales for those hours.
Save and Refresh Schedule
Once all adjustments are made in the allowed hours section save and close the spreadsheet. Then close the tab.
In order for the saved changes to take effect in the scheduler, you will need to refresh your scheduler page.