Create Events to keep your team updated.
- Announcements: Any general reminders for which you want to increase visibility.
- Closed: Holiday, inclement weather, power outages…identify dates the store was closed.
- Promotional Events: Create a promotion and assign impacted menu items.
Role Editor Privileges for Calendar Event Management
Once the Calendar has been enabled for your company, you may use the Role Editor to allow specific access to:
- Add/Edit/Delete Company Calendar events
- View the Calendar page (read-only)
- Set event default visibility to All Staff or Manager Only
- To turn on the Calendar feature within the Role Editor, navigate to Company > Role Editor.
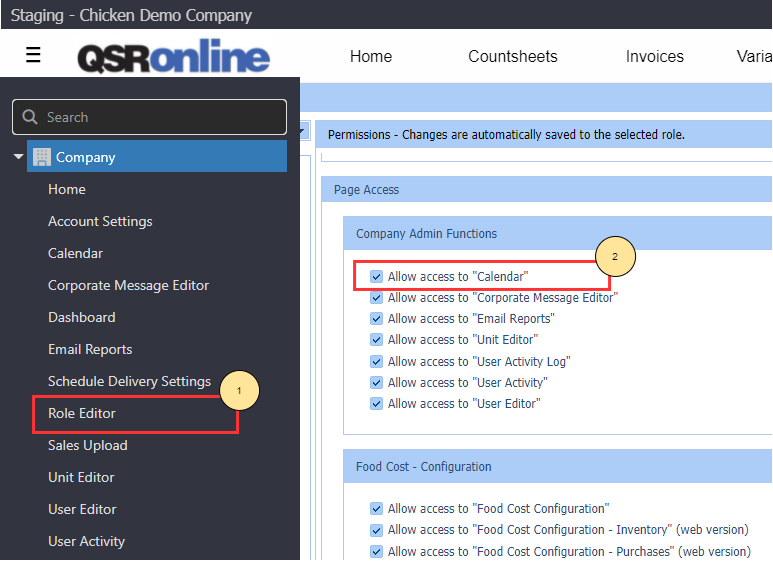
1. Company Role Editor: As usual, you access the Role Editor from the Company menu.
2. Company Admin Functions: Scroll down to the Page Access Company Admin Functions and check the box for Allow access to “Calendar.”
Role Editor – Settings Mode
In the Role Editor, you may also select what roles have access to the Calendar feature.
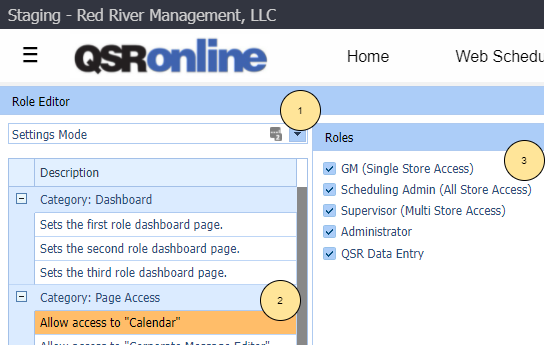
1. Settings Mode: First, select the Settings Mode in the Role Editor.
2. Allow access to “Calendar”: In Page Access, select Allow access to “Calendar.”
3. Roles: From here, you may select what roles have access to the Calendar.
Role Editor – Roles Mode
Once roles have been granted access to the Calendar, you may now define their permissions to create company and/or store level Events.
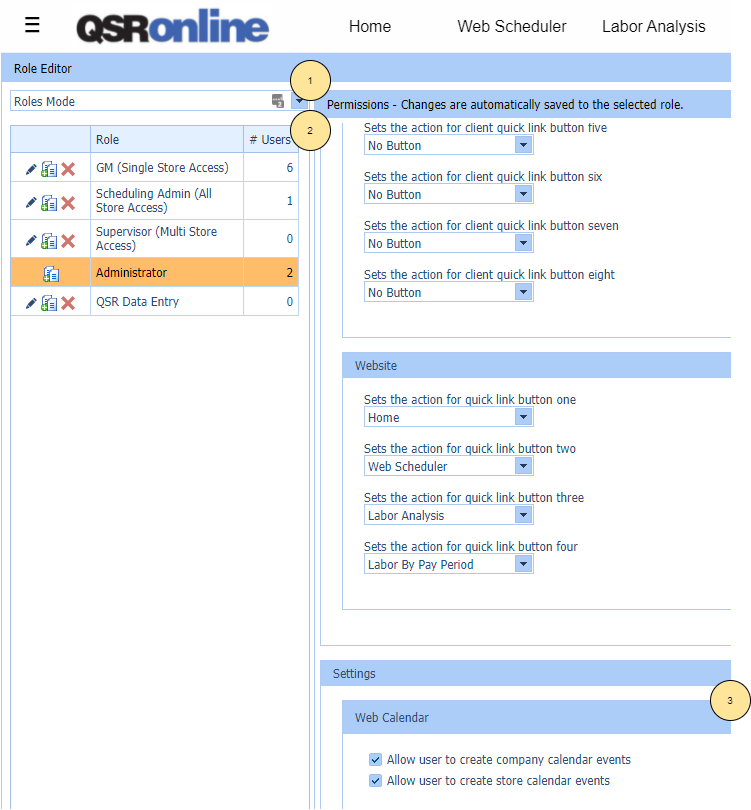
1. Company > Role Editor: In the Role Editor, select the Roles Mode from the drop-down control.
2. Select Role: Select the role that you will grant access to.
3. Settings > Web Calendar: Scroll down in the right pane to the Web Calendar settings. You will have two checkbox options to create company and store calendar events.
Accessing the Calendar
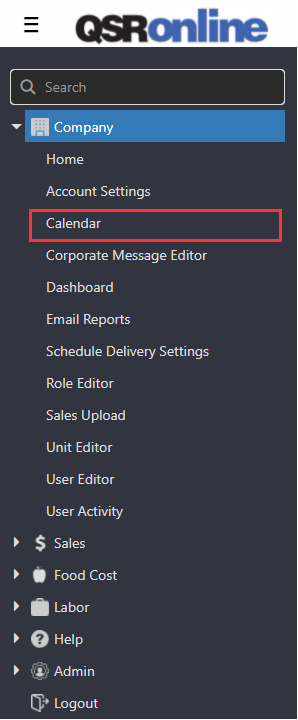
Log into QSR with your credentials and open the drop-down menu (three horizontal lines in the upper-left corner).
Expand the Company sub-menu and select Calendar.
Calendar Home
After selecting the Company > Calendar menu item, you will be redirected to the Calendar Home page.
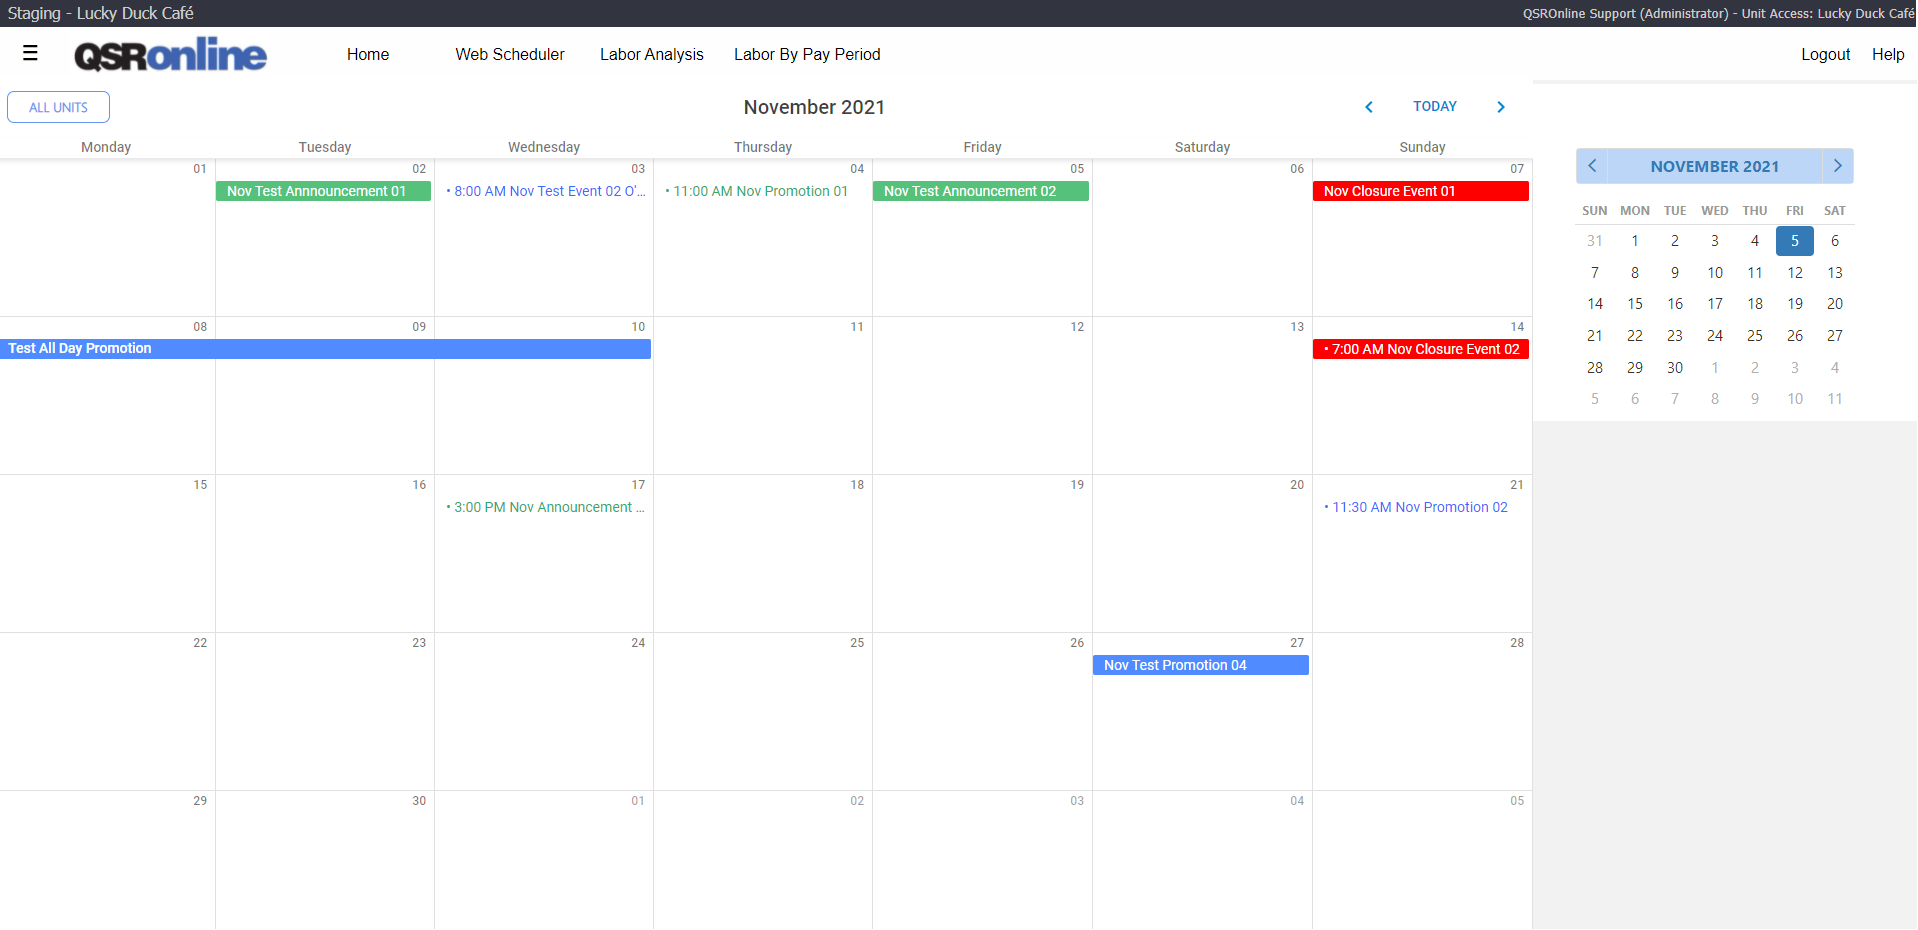
Events Color Coding
The calendar features color coding to provide visual distinction between the event levels and their duration. This table is a guide for how the color coding works.
| Event Level | Duration | Color Coding |
| Company | All Day | White text with solid blue Background |
| Company | Selected Times | Blue text and no background |
| Store | All Day | White text with solid green background |
| Store | Selected Hours | Green text and no background |
| Company & Store | All Day & Selected Hours | White text with solid red background |
Select Event Level and Unit View Filter
In addition to viewing the calendar by month, you may also specify which units to display events for your company. This feature is accessed by clicking the button to the right of the calendar view.
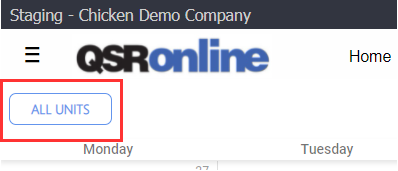
NOTE: The default view for the calendar is to display ALL UNITS. The following topics will describe how to filter the calendar to view events for the units you specify.
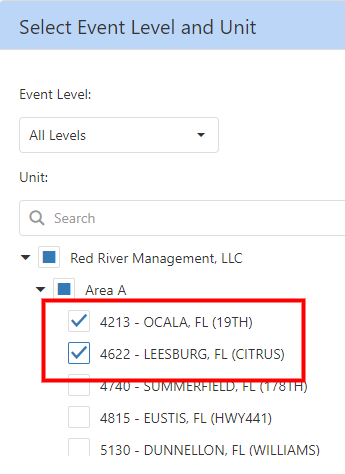
Select Unit(s): The calendar will display All Units for your company by default. The button even displays the message “All Units.” Clicking this button opens a dialog where you may filter event levels and selected unit(s).
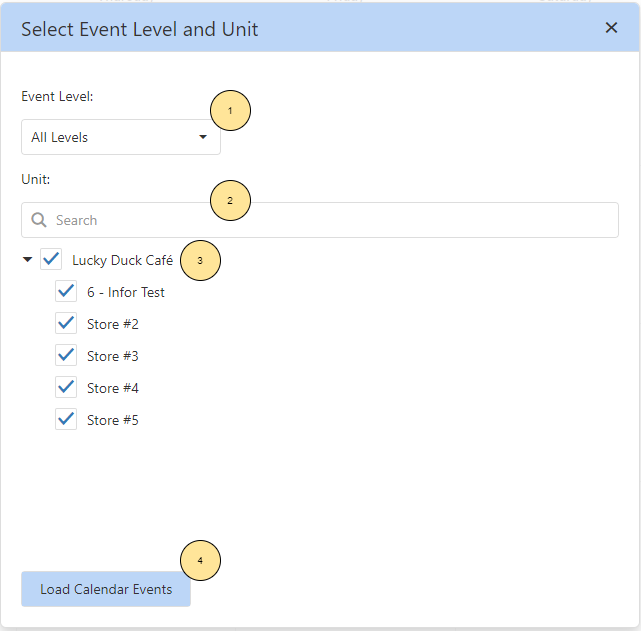
1 Event Level: You may select All Levels (Store + Company), just Store Level or just Company Level.
2 Search: For companies with many units, we have a search feature to make it easy to locate a specific unit. Just enter your search criteria and the list will automatically refresh to only return the unit(s) match the name/number that you entered.
3 Unit Selector: You may click the checkboxes for all the units to display corresponding events on the calendar.
4 Load Calendar Events: After you have selected your Event Level and Units, click the Load Calendar Events button. This will close the Select Event Level and Unit dialog and refresh the calendar to display events that match the criteria you entered.
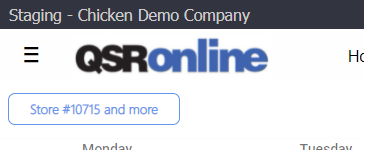
NOTE: The View Filter button will display the Store number(s) you selected. This is a reminder that you are now observing a filtered view of the calendar.
*For a single unit*

*For multiple units*
Creating Events
Follow these steps to add an event in the Calendar:
1. Pick a Day: Double-click on the day of the month you wish to add the new event.
2. New Event Dialog: The Create New Event dialog will open. Know that this is the same as the Edit Event dialog, but it does not contain any data.

1. Title: Enter a maximum of 500 characters to name the event.
NOTE: Special characters are supported with the exception of apostrophe (‘).
2. Description: Enter a maximum of 2,000 characters for the event description.
NOTE: Special characters are supported with the exception of apostrophe (‘).
3. Event Type: Refer to Event Types below for more information.
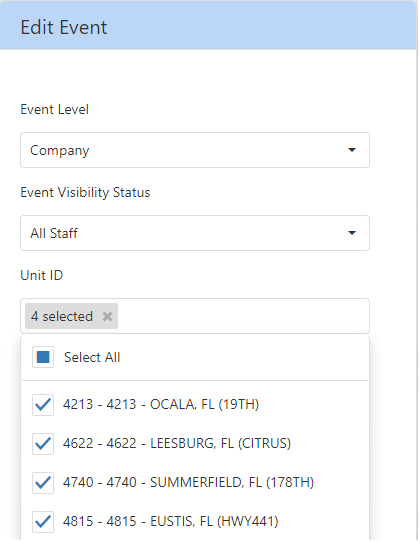
4. Event Level: You may specify either a Company or Store level event. If it is a Store level event, you must select one or more stores in 7. Unit ID below.
NOTE: If you do not have permissions to create Company level events, you may only select Store for your Level. This is to ensure that only Administrators may create Company level events and managers at the Store level may not delete or edit Company level events.
5. Event Visibility Status: You may specify if an event is visible only to All Staff or Manager Only for the Company or Store.
NOTE: Currently, for the QSROnline mobile apps, events will only show in the Managing app.
6. Unit ID: When “Company” is selected as the Event Level, all Unit IDs (Stores) will be selected for the company. When Store is selected, you must use the check boxes in the Unit ID control to specify what stores the event applies to.
NOTE: The list of Units displayed in the Unit ID list are dependent on your privileges in the Company > Unit Editor feature.
7. Start Date: Enter the Start Date and time for the event.
8.End Date: Enter the End Date and time for the event. Events may span for several days and even weeks.
9. Event Editor Operations
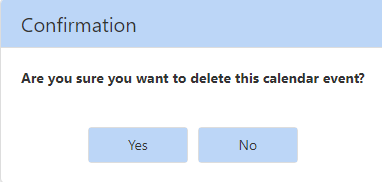
Delete: This will delete a previously created event. If you click this button, you will receive a message asking you to confirm that you wish to delete the event.
Close: This closes the event without saving the event details.
Save: Click this button to save new or changes to existing events. You will receive a message that the event was successfully saved.
Creating Events in Future Months
You may create Events in future months by using the date picker in the upper right corner of the Calendar interface.
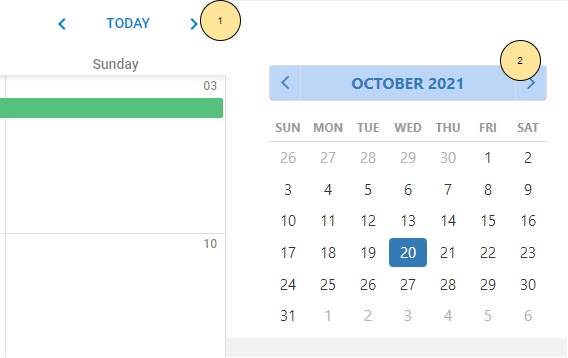
1. TODAY Controls: You can use the left and right arrows to change months and the main view with the full-screen calendar will be displayed so you may pick a day for creating an event. Clicking TODAY will return you to the current month with the current date selected in gray.
2. Navigate by Mini Calendar: You can use the left and right arrows to change months in the mini calendar to view, create or delete future events.
Editing Event
As noted in Creating Events, the Edit Event dialog is the same and is populated with data for the event. To review/edit the event details, locate the event on the calendar and double-click.
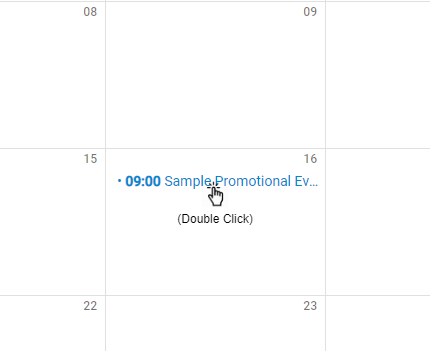
The event editor will open and you may review and edit the event details. The buttons for Delete, Close and Save are the actions you may take after reviewing/editing the event.
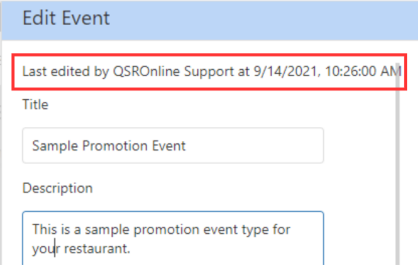
Event Edit History
At the top of the Edit Event dialog, you will see a record of who lasted edited the event and the date and time of the edit.
Copying Events
A previously saved event can be copied and pasted to a new date. Locate the event you wish to copy. Right Click on the event. A pop up will appear with a “Copy Event” option. Click the Copy Event option.
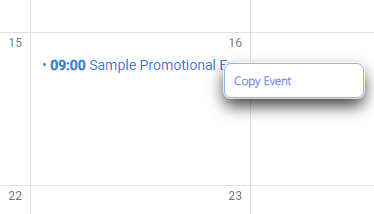
Navigate to the date where you wish to paste the event. Right click in the box for the date. A pop up will appear with a “Paste Event” option. Click the Paste Event option.
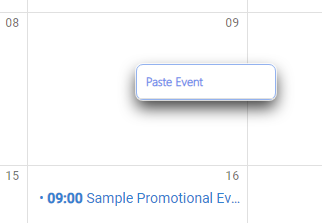
The pasted event will now appear in the box for the selected date.
NOTE: Currently if you are pasting an event to a month in the past or future (not the
current month), then once the event is saved, the calendar refreshes back to the
current date.
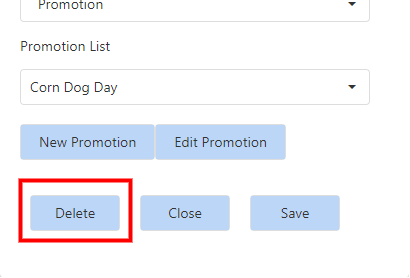
Deleting Events
You may delete events as needed, such as cases where the event is canceled or if it will be superseded by another event at a later date.
1. Locate the event on the Calendar and double-click to open the Edit Event dialog.
2. Click the Delete button at the bottom of the dialog.
3. A message will open asking you to confirm the deletion. You also have the option to click No and the deletion will be canceled.
NOTE: Deleting a Company level event will also delete that event from the Calendars for all stores selected for that event.
Adding Stores to Existing Events
1. Locate the event on the Calendar and double click to open the Edit Event Dialog.
2. Scroll down to the Unit ID field.
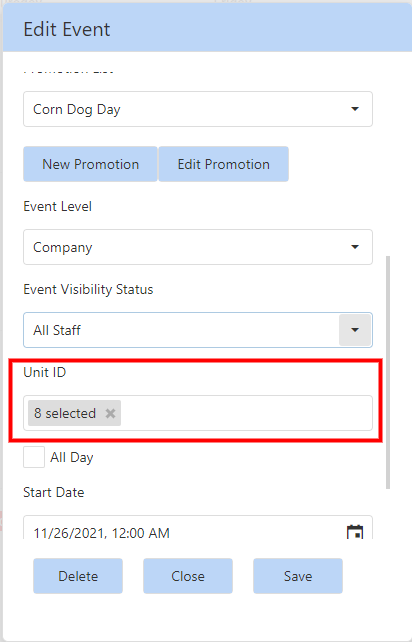
3. Click on the Unit ID field and the Unit Picker will open.
4. You may click the checkboxes for any additional units you want to add to this event.
5. Click Save and the additional units will now be added to the event.
Removing Stores from Company Events
Follow these steps to remove Stores/Units from Company Events.
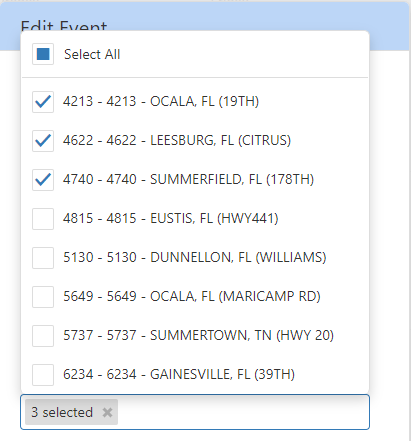
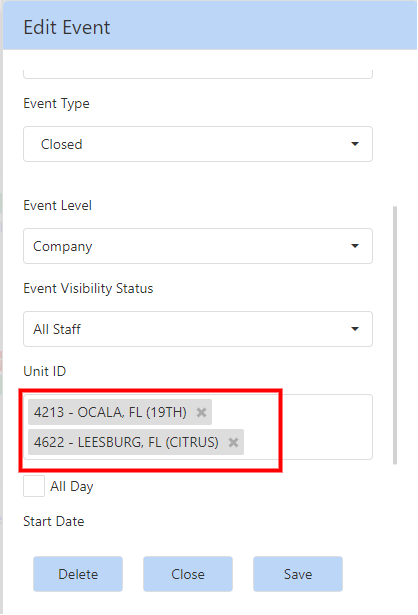
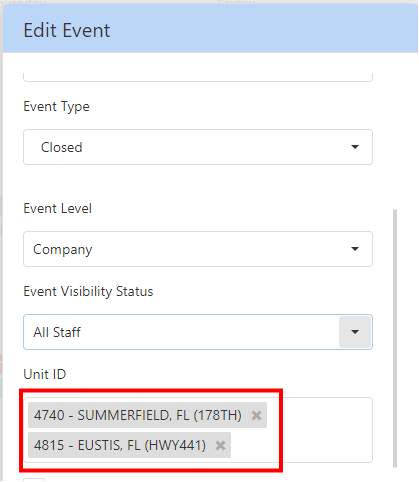
1. In this example, we have an event with four units: 4213, 4622, 4740, 4815.
2. We want to remove Stores 4213 and 4622 from this Event.
3. Open the Calendar View Filter.
4. Deselect all Stores, and then only select the ones you want to remove from the Event (4213 and 4622 in this example).
5. The Calendar will refresh.
6. Open the Event and verify that it only displays the two Stores you selected.
7. Now you may delete this event.
8. The calendar will refresh automatically and the event no longer appears.
9. Open View Filter again and select All Units, then click Load Calendar Events.
10. The Event will appear on the Calendar again.
11. Open the Event again and verify that the remaining Units appear.
Event Types
This section provides information about the Event Types listed in the drop-down control in the Create/Edit Event dialog.
Announcement
This is a flexible event type with no additional fields. They can be used for HR events or other notifications for the Company or selected store(s).
The Title and Description of the event are used to provide details of the Announcement for employees.
Closed
These are events to indicate when stores are closed. Be sure to use the Title and Description fields to provide details for the Closed event for employees.
Promotion
This feature allows users to create unique Promotion event types. Further, users have the ability to assign impacted menu items to those promotion types.
NOTE: The system will identify Promotional events with the same Promotion Type for future trend reporting.
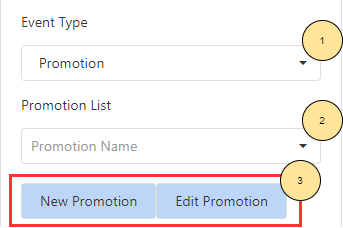
1. Promotion Event Type: When you select Promotion from the Event Type drop-down, the interface will change as described in steps 2 and 3 below.
2. Promotion List: This drop-down control allows you to select from previously created/utilized Promotions.
NOTE: By selecting a previously created promotion from the list, the QSROnline system records that the promotion has been run multiple times. This enables companies/units to report on trending for promotions.
3. New/Edit Promotion
New Promotion: Click this button if you selected the Promotion Event Type and need to create a new Promotion with associated menu items.
Edit Promotion: Click this button if you need to edit the existing Promotion associated with the event you are currently viewing.
New Promotion Type
As indicated above, Promotional event types are unique in that the user is required to associate menu items to the Promotion. This is performed in the New/Edit Promotion Type dialog.
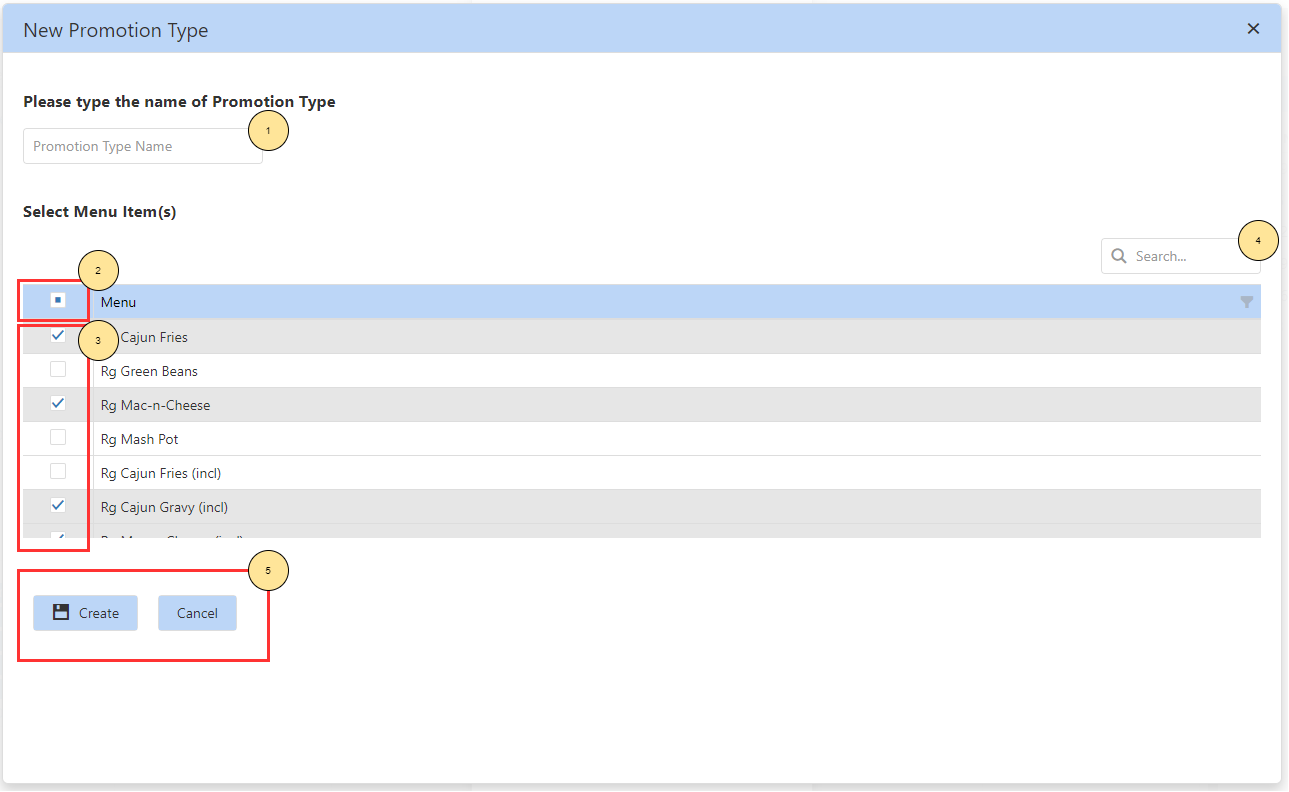
1. Promotion Name: Enter a unique name for the promotion. This should have already been provided by the company marketing department or by the manager for the store. The Promotion name should be descriptive enough, then socialized within your company or store(s) so that all employees will become familiar with the name.
NOTE: Special characters are supported with the exception of apostrophe (‘).
2. Select/Deselect All: The header of the list in this dialog depicts a check box control to the left of the “Menu” label. Checking or unchecking this control will select all or deselect all menu items respectively.
3. Multi-Select: Alternately, you may multi (marquee) select specific menu items. Simply click the check box for each menu item that will be part of the promotional event.
4. Search: Some stores have lengthy menus. The Search feature allows you to rapidly locate menu items if you know their name(s).
5. Create/Cancel
Create: After you have entered a unique name and selected the menu items for your promotion, simply click the Create button and the Promotion will be created. You may now select from the Promotion List when creating Promotion Type events.
Update: If you are editing a menu item for an existing Promotion, the Update button will be displayed so you may save the changes.
NOTE: If the name of the promotion has been changed and the Update button has been clicked, the Promotion List in the drop-down will not show the updated name for the promotion. This is because the list of promotions has not yet updated from the database to show the new name. But if the event is saved and then re-opened, the updated promotion name will be shown.
Cancel: If for whatever reason the Promotion needs to be canceled, just click this button and the Promotion Type event will not be created. Any changes made to the event will be discarded.
Events in the Mobile Apps
You may view events in both the iOS® and Android® mobile apps as described in the subsections below. The first version of the Calendar includes viewing saved events in the Managing App. Similar updates will be made to the Scheduling App in future versions.
Managing App
Events that have been saved in the Calendar can be viewed in three places in the Managing App: Roster Page, Shift Trade requests and Request Off requests. If changes have been made to events while a specific page is open, they will only be reflected when the page is refreshed. Navigate away from the page and return to the page to see the updates.
Roster Page
The Roster Page now has a Calendar Events section at the top of the page. Any events saved for the selected store will be viewable in a shortlist including the event date, time and event title.
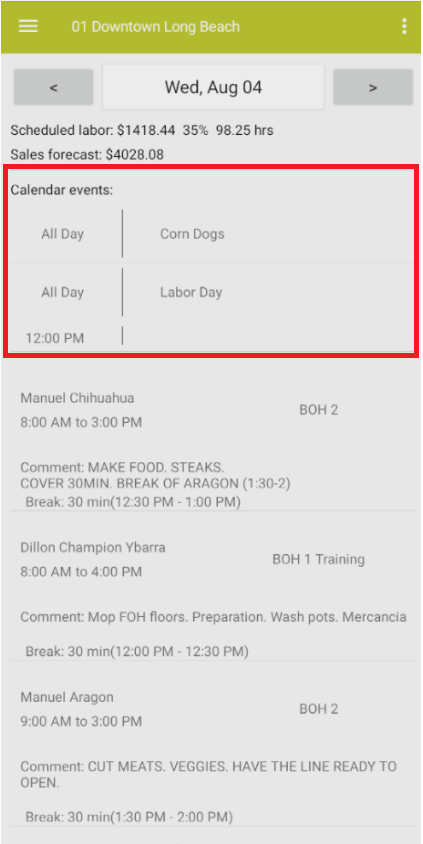
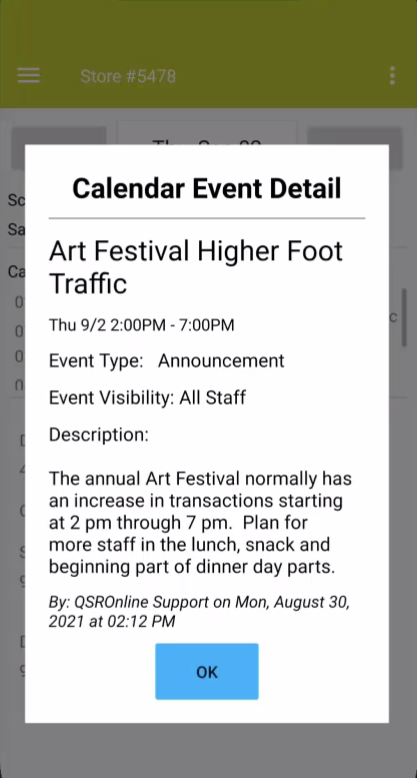
Clicking on any of the events will open a dialog box showing the event description and user/time stamp for most recently saved changes.
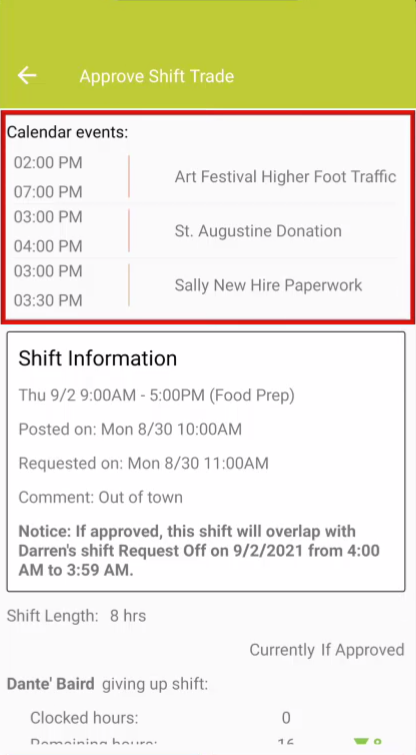
Shift Trades Page
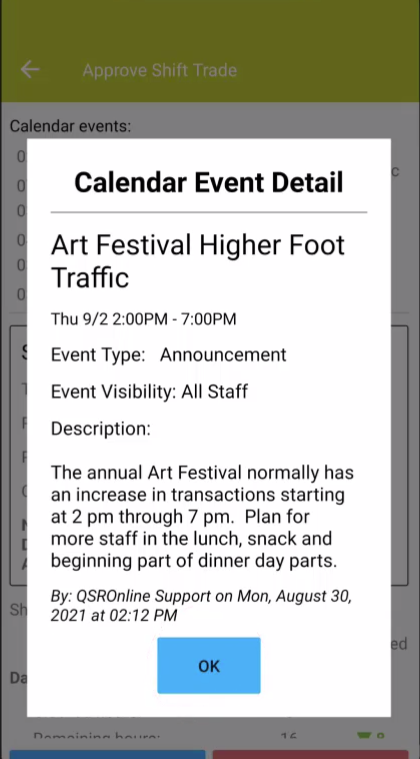
When deciding whether to approve or reject a shift trade, it is important to know what events have been scheduled for that date at that specific store. When a shift trade request is opened, a Calendar Events section can be viewed at the top of the page. Any events saved for the selected store on the date of the requested shift trade will be viewable in a short list including the time and event title.
Clicking on any of the events will open a dialog box showing the event description and
user/time stamp for most recently saved changes.
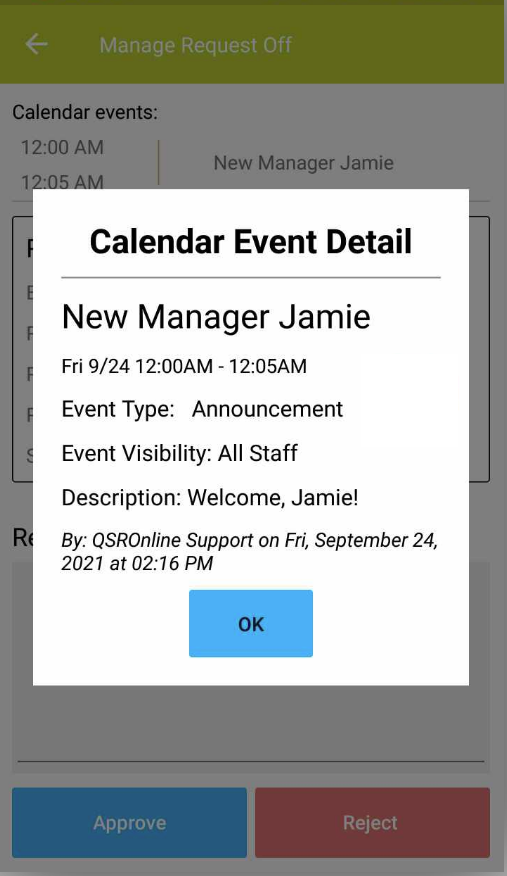
Request Off Page
When deciding whether to approve or reject a request off, it is important to know what events have been scheduled for that date at that specific store. When a Request off is opened, a Calendar Events section can be viewed at the top of the page. Any events saved for the date of the request off selected store will be viewable in a short list including the event date, time and event title.
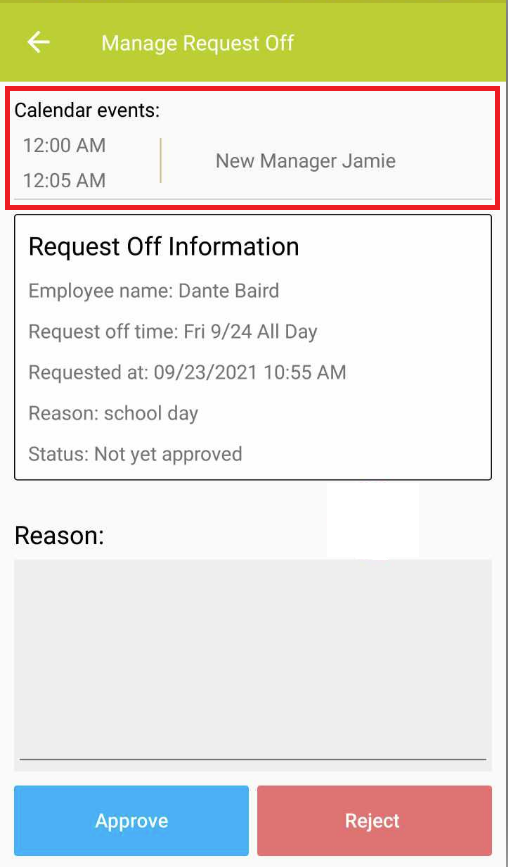
Clicking on any of the events will open a dialog box showing the event description and
user/time stamp for most recently saved changes.
Training Videos
Manager Training

Administrator Training